I may have my idioms mixed up, but rainwater catchment goes back a very very long time in history. Although it certainly goes back to the Indus Valley, in some sense it probably is prehistoric. The Romans, however, applied their engineering skills to the task (along with the famous aqueducts), and made some significant innovations.
In this post I’m going to talk in some depth about my plans for rainwater harvesting, which has the two-fold purpose of demonstrating some interesting sustainability techniques, plus also reducing the ecological footprint of the construction and residence. This post is also an experiment in a different writing style – I’m going to explain not only the design outcome, but many of my steps (and missteps) along the way. A lot of people have written up their finished rainwater systems; it seems less common for people to talk about the ideas they have considered or the attempts they have made, which they later ruled out. I hope this provides some interesting fodder for people designing their own systems.
Going back to the ecological footprint, there are three factors I wanted to consider: stormwater runoff, consumption of limited groundwater, and exposure to the potentially toxic chemical byproducts.
- One of the major considerations for new development (at least in NY) is the “stormwater pollution prevention plan” or SWPPP. The addition of impermeable surfaces (like roofs and roads) interferes with the normal absorption of water into the ground, and potentially causes significant additional runoff to arrive in streams. Along with this runoff are various types of pollution that would be found on the surface, ranging from silt to fertilizer to motor oil from cars. To the extent that we can minimize the amount of runoff, we can reduce the magnitude of the required catchment areas and reduce the amount of material deposited there.
- The sole source for drinking water in our community is groundwater (wells). We have a pair of high-performing artesian wells that dip into a local aquifer that was recently studied extensively by the USGS. (One of the wells was even part of their testing.) However, as more homes are built both in our community and elsewhere in the town, the demand on this aquifer will increase, and it’s possible that at some point it will have trouble being replenished quickly enough to supply all of the needs. Thus, having an independent source of water (rainwater) will both reduce dependence on, but also demand on this aquifer.
- Because our community exceeds the minimum size set out by the EPA for a “community public water system”, we are required to use “approved” chlorine treatment in our community water. Many people respond badly to the chlorinated water and are filtering it back out at their own homes. Even the CDC is now questioning some of the potential health effects of the by-products of chlorination. By using rainwater and then not sending it underground, it should be legal to use filtration combined with UV sterilization (which is actually more effective than chlorine against cryptosporidium and giardia) to supply potable water to the home. (The effort to get this approved in Tompkins County NY was led by a couple of intrepid “Earthship” homebuilders, for which I’m very grateful.)
For me the first logical step in thinking about rainwater is understanding rainfall conditions in our area. So I created a rainwater calculator that utilizes raw data from the local weather station month-by-month over ten years. Later, I realized that the effects of averaging over month-by-month data really prevented me from understanding important parts of the system, so after some digging for a reasonably trustworthy data source, I shifted to a model based on day-by-day data. Even that has some limitations I don’t really like, but I was not able to find an hour-by-hour rainfall source that I could trust and match up with the seemingly reasonable daily and monthly data. I’ve used these data to come up with an estimate of the average rainfall, to look at the amount stored over time, to understand how the amount of storage would impact both full and empty conditions, etc.
Basic Operational Features
First, let me explain some of the principles at play here. I’m going to shamelessly lift some images from the Texas Manual on Rainwater Harvesting, one of the widely-cited references on the topic. These steps are:
- Rainfall – what are the regional properties of rainfall relevant to the design
- Catchment – how is the water collected; how much area; relation to rainfall
- Leaf filters – removing large objects such as leaves from rainwater
- First Flush – cleaning sediment deposited on roof during dry intervals
- Prefilter – removing smaller objects which might clog storage tanks
- Storage – bulk water storage volume
- Pressurization – bringing stored water up to usable pressure
- Postfilter – remove remaining small particles that interfere with treatment
- Treatment – making water safe to drink
The process for designing has been somewhat iterative. For example, I first looked at the gross rainfall numbers, catchment area, and storage to get a ballpark idea of how much storage was likely to be required. Then I later had to fine-tune these numbers based on expectations for filtering losses, greywater reuse, etc. As I describe the work below, I’m working from the high level considerations down to the details.
Just as a note, I’m going to use some abbreviations below so I don’t have to keep writing out complicated units: gal = gallons, sf = square feet, gpd = gallons per day, gpm = gallons per minute.
Catchment and Storage
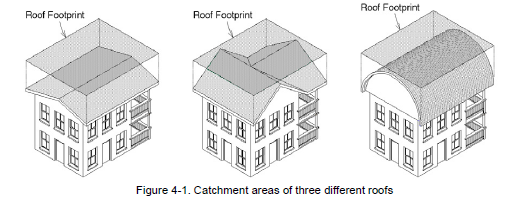
First, consider the roof footprint or “catchment area.” Except in the case of a flat horizontal roof, this area is always less than the area of actual roof material. Using this number doesn’t really account for unique aspects of the weather (such as prevailing wind direction) or the site (trees blocking rainfall or wind) but it’s still the best general approximation for how to convert “inches of rainfall” into “gallons collected” – specifically, 0.623gal of water for every square foot of area. In my case, I began work using the slightly conservative estimate of the house footprint (648sf) rather than the roof, which will have some additional overhang (giving perhaps an extra 16%, or 754sf). The smaller number gets me 404gal per inch of rain.
By using my modelling spreadsheet, I can see that he roof is collecting on average 43gpd given our local rainfall conditions, and that is cut down to 37gpd by some of the filtering considerations below. (Some more is lost when the storage capacity is full, but we’ll talk about that in a bit.)
That covers the input (production) side. However, in order to effectively simulate performance around the storage tanks, we also need to measure the output: water consumption. Guesstimating water consumption is pretty difficult, particularly since I don’t even know who is going to be living in the home. One could use anything from single occupancy up to a reasonable (by residential code) limit of 4 residents.
Because of my involvement with our Infrastructure Committee, I happen to have data that says that the average use in our community, measured as a function of the number of bedrooms, is about 38gpd/bedroom. Given that this is a 2-bedroom house, that would nominally mean 76gpd, corresponding to 4-person occupancy.
However, I’m going to adjust my estimates assuming that we’re able to implement greywater recycling for toilet flushing. (It is easy to buy a simple version like SinkPositive that just allows you to wash your hands and uses that to refill the toilet tank, but I want something that works with an accessible sink and isn’t limited to just handwashing water.) Toilets flushing is one of the largest single contributors to home water use, about 27% on average in the US. Even using estimates for low-flush toilets rather than the less efficient ones many people still use, it is easy to account for 25gpd (32% of our 76gpd). So let’s take this 25gpd, arriving at 51gpd for all other uses, for 4-person occupancy. For 2-person occupancy we’ll just halve the number.
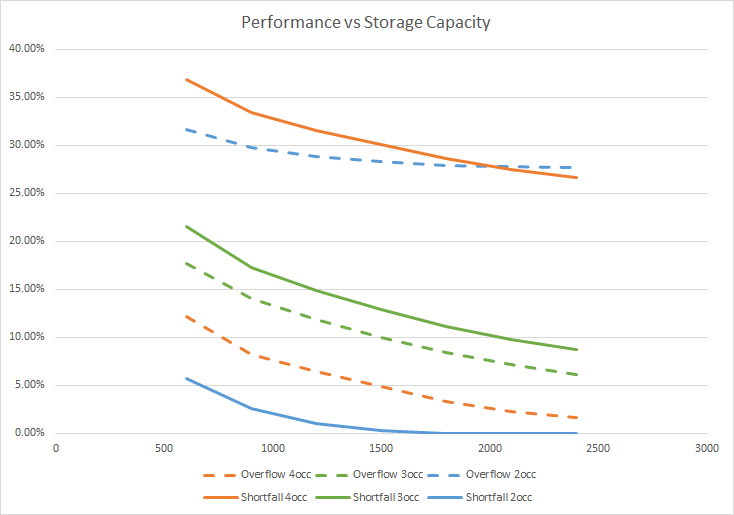
Hopefully it’s fairly obvious that the relationship between production and consumption is the most important aspect of system performance. If you’re collecting only 37gpd on average, and using 51gpd on average, you’re not collecting enough water. If you’re collecting 37gpd and using only 25gpd, you’ve got a surplus. Storage helps at times, but it won’t change the overall picture, as shown in the graph below. With two people, we’re overflowing any reasonable amount of storage ~30% of the time. With four people, we have a shortfall with similar regularity. This is a direct reflection of the collection capacity of the roof.
In the long run, one obvious way to address this is simply to increase the catchment area. If we were, for example, 35% short, we could add another ~225sf of rainwater collection area. For this reason, I’m imagining that I may use a ground-mounted solar array, in part to increase the potential area for rainwater catchment.
So in essence, with the current roof area, the system right now is sized for what you might consider an average 3-person occupancy. We will just work with this starting point and assume that either (a) the residents limit their water usage to what can be harvested from rainwater; or (b) the residents don’t mind using community water when they run out. Of course, if you make those assumptions, then by definition you can’t compute anything interesting about storage. We do want the system to have some storage, so for that purpose we’ll consider the 3-occupant, 37gpd model, i.e. where production and consumption are roughly similar.
We also need to consider pragmatic limitations: the basement entrance won’t allow us to install or replace tanks larger than about 47″ in diameter; the ceiling limits us to tanks no higher than 92″ (and, if we want to be able to get any access to the top, probably more like 80″). However, we can install multiple tanks, and interconnect them for more storage. Each tank is adding system cost, but if they’re all ordered at once some of those costs (like delivery charges) will be constant. My current working selection is a Rotoplas RP-590283 tank, which holds 300gal and is at present selling for about $250. These are 36″ in diameter and 76″ high, so they are easy enough to get into the basement. This means our storage capacity will be sized in 300gal increments.
Based on the graph above, you can see that more storage always helps, unless you’ve only got 2 occupants. 4 tanks (1200 gallons) will mean our 2-occupant family is only using community water about 1% of the time, and when starting from full tanks they can weather a 48-day total dry spell. For higher consumption, there’s always a return on storage, but even with just 3 occupants, reaching this 1% level would require more than 7000 gallons of storage, which is just silly.
For the present, I am satisfied with a 1500 gallon system capacity which will be more than enough for 2 occupants, leave 3 occupants on community water about 13% of the time, 4 occupants about 30% of the time. Let us now turn to some of the more subtle design aspects.
Prefiltering and First Flush
The enameled steel roof that I will be using is pretty much ideal for potable water collection. It doesn’t leach out much in the way of undesirable chemicals, like you might see from an asphalt shingle, plastic, or galvanized roofing material. It doesn’t give off particles of its own, and it doesn’t particularly trap particles. Also, since there are no trees of any size within hundreds of feet of the house, I don’t have to worry much about leaves.
Nevertheless, it’s helpful to put screen filters into the system to catch anything large that might be coming through. Although these can go over the gutters themselves, or be put directly at the downspout entrance, that means needing a ladder to clean them, so I expect that I will opt for an inline filter basket in the downspout. I haven’t definitively decided on a model, but some that I am considering are the AquaBarrel Slim Line at $50 or the Leaf Eater Ultra at $40. Some of the cheaper products (Amerimax FlexGrate, $6) are not enclosed and seem like they would be too susceptible to letting as many things (dust, bugs, etc.) in than they keep out. There are also more expensive products (WISY FS305, for $400 or more) that are pretty and made out of stainless steel, but which are likely overkill if there is additional filtration in the system, and needlessly push up the system cost.
For additional filtration, I plan on using a “first-flush diverter” to eliminate some of the fine particulates (e.g. summertime pollen and wintertime wood ash) so that the incoming water is cleaner. The way this works is to assume that any time it hasn’t rained recently, the roof is dirty; based on this assumption, the first small amount of rain is shunted off to a holding chamber which captures the sediment along with that water. When the holding chamber is full, the (now cleaner) water is directed into storage. Typical recommendations are “13 to 49 gallons per 1,000 square feet.” I’m starting with a mid-range number of 23gal/1000sf, which roughly corresponds to another number I have seen, which is the first millimeter of rain. Or, simply put, 15gal.
Now it turns out that if we have a rain of 1mm or less, then it all goes into the first-flush system – which based on daily rainfall data happens for about 27.5% of the rainy days. On the other hand, because many rainfalls are heavy, I only lose a total of about 14% of the rainwater to the first-flush system. (In fact, if we use the 2-occupant model, I actually lose more water – over 28% – due to the system being full and not having capacity for more water to be stored!)
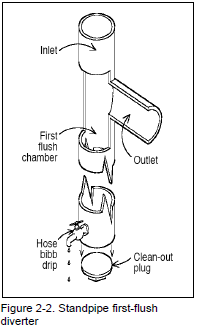 You can buy a first-flush diverter, but you can also build one, which turns out to be pretty simple. There are a number of ways, but one of the simplest (shown here, again from TMRH) is simply a standpipe with a “weep hole.” The sediment falls to the bottom of the standpipe; when the pipe is full, the incoming water can’t go into the standpipe any longer, and gets directed to storage. In this partial cut-away drawing, the “weep hole” is actually replaced by an adjustable valve (“hose bibb drip”) but that isn’t strictly necessary. So one can calculate the capacity based on the number of gallons that fit into a given diameter and length of pipe.
I tried to find a nice table for this, and the best I could come up with was this chart from Wake County, North Carolina. The most readily available pipe is usually “Schedule 40” rigid PVC pipe. I made up a quick table for practical sizes that one might consider. It is interesting that there’s a sweet spot in price per gallon for 6″ pipe. The problem, of course, is that if you are trying to fit 15 gallons of storage into a vertical pipe in an 8′ high room, you can’t fit it into a 6″ pipe. The 8″ pipe, on the other hand, will come in a little under 6′.
| Nominal Size | Gallons/Ft | $/Ft | $/Gallon |
| 3" Sch 40 | 0.384 | $1.83 | $4.76 |
| 4" Sch 40 | 0.661 | $2.18 | $3.30 |
| 6" Sch 40 | 1.5 | $4.02 | $2.68 |
| 8" Sch 40 | 2.6 | $11.70 | $4.50 |
So imagine that we have that piece taken care of, what comes next? Well, ideally we want to filter out any particles that still make it through. Unfortunately, we don’t have a huge amount of pressure so most of the conventional filters that are used for city water probably won’t work. Another filter that is sometimes used for rainwater is a “slow sand filter“, which is a biologically active filter that takes out both particulates and microorganisms that may be coming in. However, true to their name those operate extremely slowly (gallons/hr rather than gallons/min) so they would need to have a lot of capacity to avoid losing useful rainwater. There are, however, some filters that are specifically made for rainwater catchment.
The filter I’m most likely to go with is the Maelstrom which is made in Australia – a country where rainwater collection has become a bit of an art form. The advantages of this filter are that it filters down to 180 microns (0.18mm) even though it can handle flow rates of 80 gallons per minute with minimal losses. (Some people even use the Maelstrom as a direct filter for the downspout water, but it seems like it would be more difficult to clean so keeping the larger particles out should make it require less service.) Also, it works with standard 4″ pipes, and can be mounted in any of several convenient ways including directly at the top of a tank. While it would be great to get to 30 microns or less, we’ll save that for after the storage tanks where the water is pressurized.
Pressurization
In the storage tanks, the only pressure the water is under is its own weight – an 8′ high column of water gives about 3.5psi, and our tanks won’t even be that tall. We need to increase the pressure to the level where appliances expecting city water (30-40psi) will operate normally. If we were trying to handle large volumes of water, we would potentially need a big pump for this, and that means a lot of power. However, if we have enough intermediate storage, we can potentially use a lower flow rate “slow pump” and thus avoid a big power draw.
It turns out this set of requirements exactly matches something that is widely available: fresh water pumps for recreational vehicles. Pumps like the Shurflo 4048 from Pentair deliver exactly what we’re looking for: flow rates up to 4gpm, pressures up to 55psi, and operation from 12V at less than 10A. We then need to couple this with a relatively large pressure tank to give the pump enough time to get the pressure back up for normal usage. A Pentair WM25B, Goulds V260, or Amtrol WX-255D each provide 25-30 gallons while keeping the pressure between 30 and 50psi.
Postfilter and Treatment
We’re ready to make this water drinkable. Because the water is not going underground again after treatment (for which the only approved solution in NY state would be chlorination), we have a number of options. The most appealing, because of the lack of chemical residue, is UV treatment. It wasn’t clear to me how much power this was going to take, but it turns out that it’s the equivalent of a light bulb. One of the critical things for UV treatment, however, is ensuring that there is no sediment in the water that could block the UV light from treating it effectively. A convenient solution to this is a combined sediment filter and UV unit.
While I was originally looking at Viqua (first some of their high-volume units such as VH410M and then later at S2Q-P/12VDC), none of these included a sediment filter. I found the UV006 unit by PuraUV which includes the sediment filter, supports a higher flow rate (8-10gpm), and like the S2Q-P/12VDC can be operated from 12V for off-grid applications. This draws only 22W – it requires less power than the pump!
To save myself from having to replace the filters in the PuraUV too often, I also plan to include one additional filter, a Rusco 15 micron spin-down filter. The nice thing about these filters is that they can be cleaned simply by opening a “flush valve”, and the pressure of the water itself washes the accumulated grit off the filter. Although they may need to be replaced eventually, they can be reused thousands of times rather than needing a replacement filter every 6 months.
Community Water Backup
There’s one step I’ve left off above, because it seems like it would confuse things, which the the backup for using community water when we run out of rainwater. I considered two slightly different ways to approach this: adding the backup water into the storage tanks, or switching the backup water on after the treatment system. (Since this water is already chlorinated, it doesn’t need to be treated again.)
The advantages of going into the storage tanks are:
- The solution can be purely mechanical – like the valve on your toilet tank, a float valve can be used to turn this water supply on only when the level in the tanks is so low that they’re considered “empty.”
- The chlorinated water can effectively disinfect all the subsequent portions of the system, if there is every any sort of issue.
- A minimum level of water can be maintained which is always available with solar power, even if grid power is out.
- An “air gap” can be installed to prevent any chance of rainwater backflowing into the community system.
The advantages of switching the water on after the treatment system are:
- The pressure pump and UV system can be shut down when we’re out of rainwater, drawing no power and saving wear and tear.
- The backup water can be used to supply additional pressure if the rainwater system is not keeping up.
- Easier to integrate rainwater system after-the-fact.
Probably based entirely on the last reason in the list, I expect to start out with the house plumbing directly connected to the community water supply, and then as time and money allow, add in the rainwater system. Then, if it appears at that point like the direct-to-storage-tank solution would be better, I can adjust the inlet plumbing to accommodate that.
Conclusion
Collecting a little rainwater for watering your garden is something anyone can do. It is easy and certainly worthwhile. In contrast, attempting to supply water to an entire household based entirely on rainwater, while making this more-or-rainwater_calculatorless invisible to a “western, developed-world” homeowner who expects never to think about where their water comes from, is an undertaking of an entirely different scale. I hope that the data, tools, components, and overall thought process that I’ve shared here will make it easier for others to pursue similar projects in the future.
P.S. The complementary conjugate idiom, “When in Rome, it pours,” is probably somewhat less valid. Rome gets less rainfall than Ithaca, averaging about 31 inches/year.


