Do Over: Floor, Mark 2

Since part of my goal is to document the process of construction, it’s time to declare my first major oops.  Maybe this will save someone else from doing something pointless and wasting time and money.  Sigh.

I am not happy with my floor implementation.  It feels solid and well insulated, but there are numerous issues with it that have led me to decide to start over.  In the end I expect I’ll waste about $600 and maybe a week worth of labor, but I think the end result will be better.

First, I wanted to nominate Terry S. for the “you called it” award on water.  Even with one layer of house wrap, fully taped, and not one but two 30×30′ tarps tented up and covering the floor, it is still basically raining inside every time the weather turns warm or launches into a downpour that melts the snow.  While I’ve had builders assure me that the water will just run through, and it will dry out, and it will all be fine, I’m not certain enough to trust putting the rest of the house on it without checking.  And checking means starting to peel up the subfloor so I can look inside, and once I start that if it looks bad, I’m going to need to redo things anyway.

But that by itself could just be a bit of maintenance in the spring.  No, there are a lot of other problems that have combined to make we want to start over on the flooring.

  • Elevation: because of the additional 6″ of height added by the flooring (which would of course have been there with SIPs as well) making the home accessible is turning out to be a lot more difficult that I would have liked.
  • Structural: the bottom inlet nailers for the wall SIPs would have been mounted to the floor stack, which itself is not really a tested structural element.  (SIPs would have been better, but not ideal.)
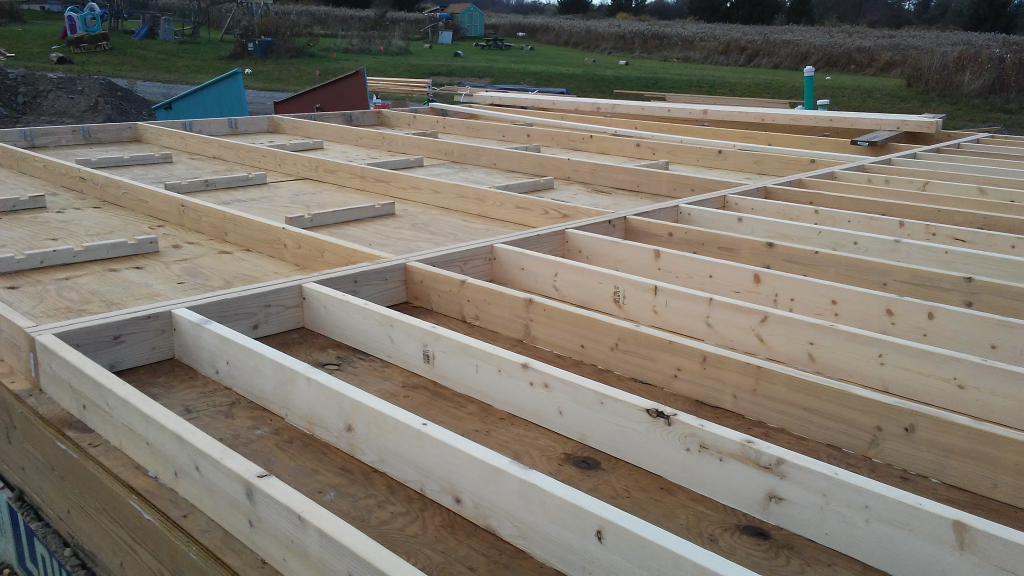
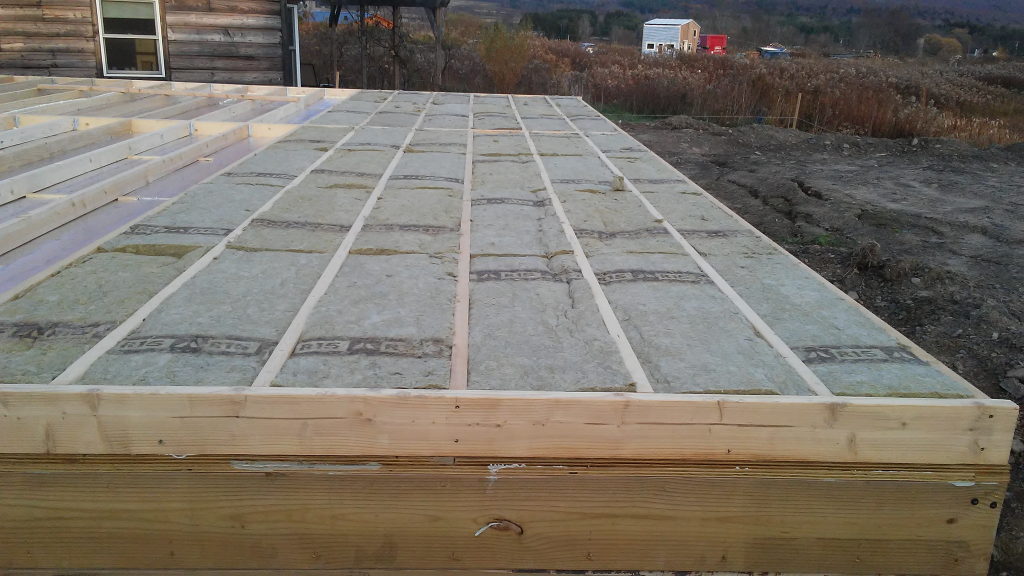
  • Levelness: in my rush to get the floor in place before the winter, I didn’t do a great job of shimming around the I-beams to bring the rim joist level up to the I-beam level.
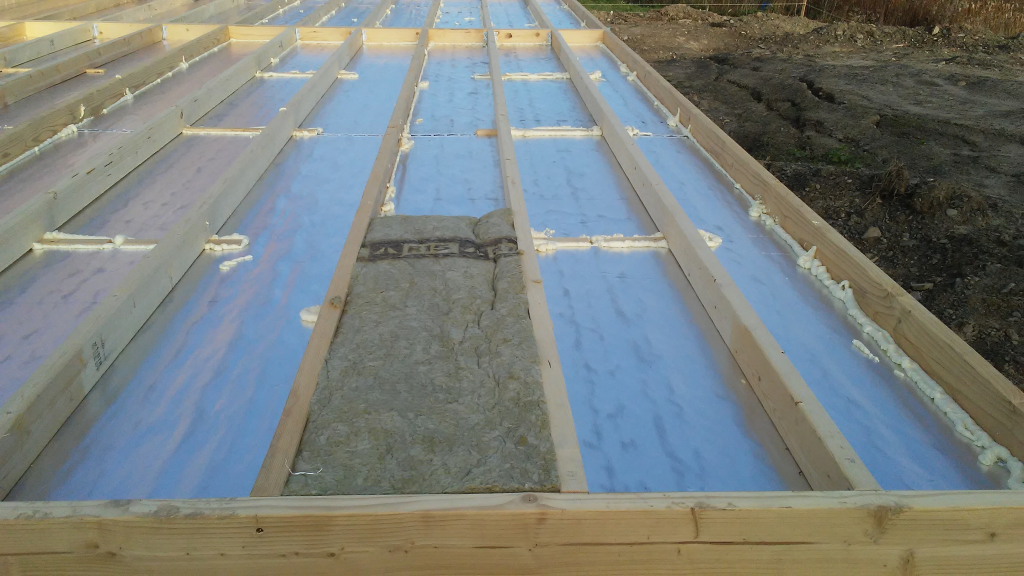
  • Mechanicals: with the insulation sandwiched between the two layers, any mechanicals (plumbing and electric) going through to the basement would have to be cut through both layers of board plus insulation.
  • Water damage: may or may not have occurred.

So, I’ve come up with a new plan, and by choosing to go forward despite the possibility that the current floor is “sound” (with respect to the water – all the other issues would still stand), I have the opportunity to implement a good fraction of it (the first three steps) from inside the basement during the winter, so there will be less of a scramble to do the added work when spring comes.

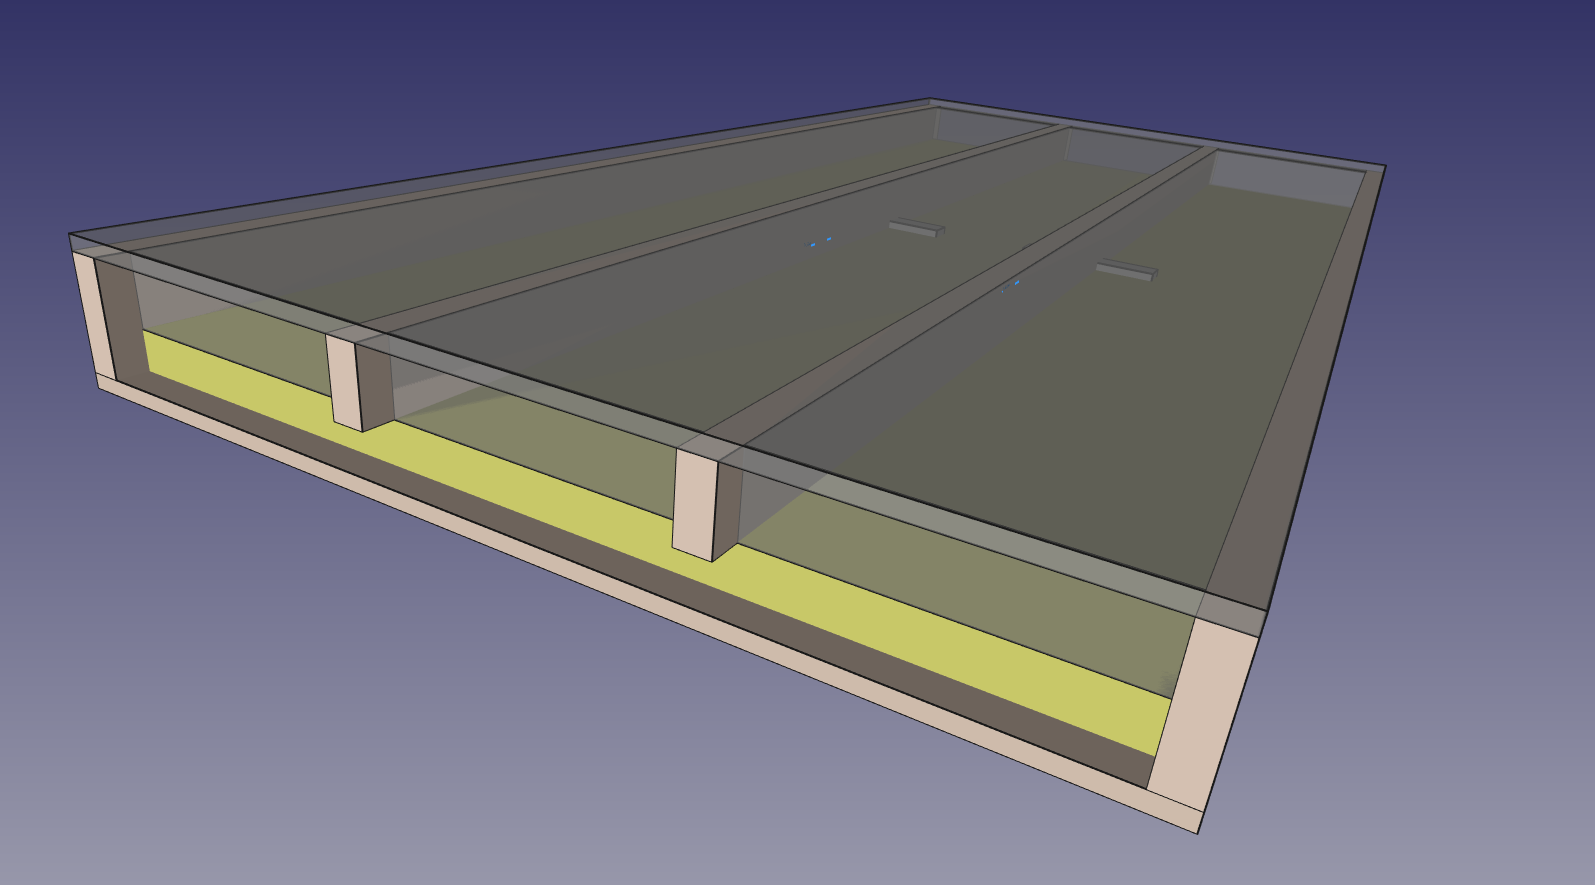
  1. Cut 2×8 joists to fit between (and perpendicular to) the I-beams.  Notch these at each to a depth closely matched to the flange thickness of the I-beam, so that when assembled the top of the joist and I-beam will be flush.  (This addresses the elevation issue: subfloor will eventually sit 6″ lower.)
  2. Remove screws from bottom of current assembly.
  3. Insulate rim joists.  (May need to wait depending on other steps.)
  4. Strip off and stack the subfloor boards.  (If the subfloor was water damaged, then it would have needed to be replaced anyway, but if it’s OK I hope to be able to reuse it since I’ll be screwing back down to identically aligned joists.)
  5. Pull out and stack the rockwool for reuse.
  6. Strip off the 2×6 and 2×4 joists and the PIR.  (We’ll have to see what order of operations works best for this.)  Stack PIR for reuse.
  7. Strip off and stack the PT plywood.  (Need to determine if it can be reused elsewhere in the project; otherwise perhaps it will show up on Craigslist.)
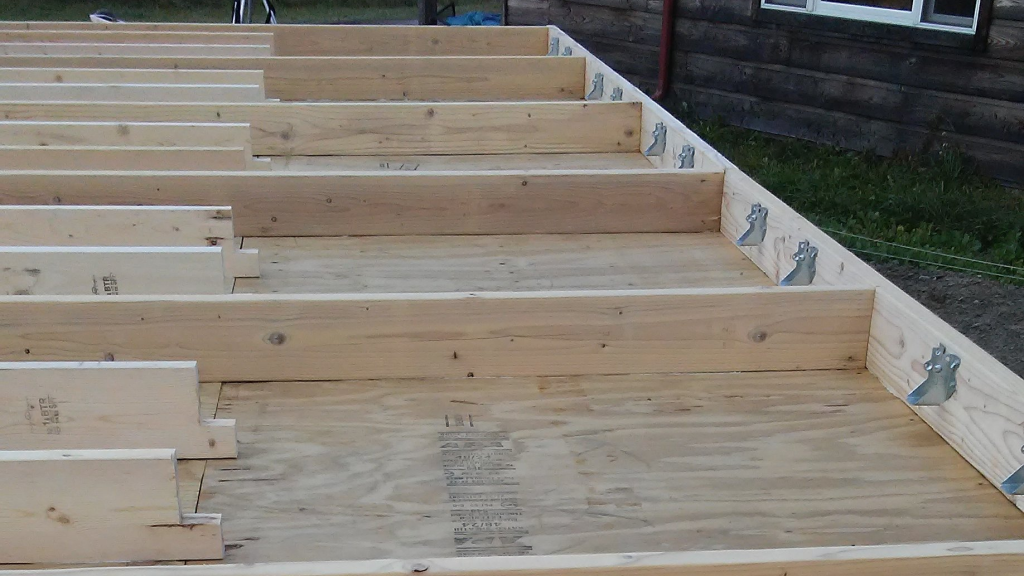
  8. Correct the shims on the rim joists to as near flush with I-beams as practical.  (This addresses the levelness issue.)
  9. Finish mounting east and west joists with joist hangars from rim joists.
  10. Reinstall subfloor.
  11. Put off reinstalling insulation until after mechanical work is done.  (This addresses mechanicals issue.)
  12. Install inlet nailers with structural screws to rim joists.  (This addresses structural issue, and is the first step of the work I would have started in the spring anyway.)

It seems like a lot of steps, but it feels like I should be able to do most of them in less than a day.  So far I’ve completed the first eight of the 7′ joists and eight of the 4′ joists, and about 20% of the screw removal.  While I was at it, I also restacked some of the stored lumber in the basement so that it’s not directly under the drip edges.  The time spent has been about 3 hours so far.

For photos see my Apr 5 post.

Wow, I’m Floored!

For the last couple of weeks it has been “damn the winter weather, full speed ahead!”  And somewhat to my surprise, I managed to get the floor panels I designed (and wrote about here) completed.  Apparently after repeated exposures, my hands finally got used to working in 37°F (2.8°C) weather, and I didn’t feel cold any longer.  My ears were protected by 3M™ WorkTunes™ headphones, which may have been the single best tool investment I have yet made on this project.  Certainly the most consistently utilized, particularly with Spotify keeping my ears happy and not merely warm.

A big ($3000) order of materials was delivered in late October, and I immediately started trying to get the flooring in place.  Zephyr was intrigued.

Curious cat is curious

At first things went pretty quickly.

However, my birthday party happened just a day or two into getting the materials, so it was almost November before I really got going.  Below you can see the bracing ready for the 2x4s to come in above the PIR foam board, and the 2×6’s used for every third span (west side) and for all of the 7′ spans (east side).

Here is some of the PIR foam board in place, 2×4’s across the top and on the braces, spray foamed along edges of PIR, as well as the first batt of rockwool.

And finally here is what it looks like with all the rockwool in place.

Then I started to get the actual subfloor laid on top.  Unfortunately, not very long into this we had our first 4″ snowfall, and thereafter I was spending a lot of time with the shop-vac removing the snow and water that was stuck inside various cavities (either on top of the PIR board, or on the PT plywood bottom layer where the PIR board was not yet laid).  Furthermore, laying the tongue-and-groove subflooring with the appropriate staggered (and thus, diagonal) pattern turned out to be extremely time consuming.

It’s probably worth sharing that the necessary tools for this are one (or more) sacrificial 2×4’s and a sledgehammer.  You lay the 2×4 against the edge of the subfloor plywood (best if it’s the groove side) and whack the crap out of it to get the plywood to move across the glue and into place.  I shattered one 2×4 along the way and beat another one beyond the point of further usefulness.  Also, on occasion, you may want wood shims (used to force the tongue up into the groove) or a wonderbar weighted down with a heavy piece of PT lumber (used to force the groove plywood down onto the tongue).  Or, you could do this with more than one person, in which case, you get someone to stand on the edge to keep it aligned while you whack the 2×4.  This is definitely one of those “better done with a team” jobs.

But, in the end, I managed to get it all in place.  I still want to come back and add the house-wrap to the remaining 2/3 of the floor, to keep water out over the winter, but at least the main job is now complete!


Was it worth it to do all that extra complex framing for the 10% improvement in insulation?  I’m not sure – maybe not.  I’m estimating that adds up to maybe 85 BTU/hr or 25W of heating saved, whereas the remaining total loss through the floor is perhaps 875 BTU/hr or 256W.  The R-41 SIPs would have been closer to 553 BTU/hr for a savings of 94W.  (All these numbers may be lower if the equilibrium temperature in the basement is higher.)  But I learned a lot of interesting things along the way.

SIP Sliding Away

This week, I threw up my hands in frustration and did a small redesign.  I have been planning all along to use SIPs for the first floor flooring (above the basement).  Unfortunately, I have been so busy with other projects like fencing our back yard against deer and dealing with my duties as volunteer Treasurer for my community, that I didn’t actually get an order placed.  Add to this that the time frame for getting SIPs delivered turned out to be 3-4 weeks ARO (“after receipt of order”), this would have put me receiving the materials somewhere around when the average daily high temperature crosses below 50°F/10°C and the snow starts to fly.  Plus, the quotation came in about $2,000 over my budgetary estimate.  I could save some of this by using a lower insulation SIP – which would probably be OK – as the basement will generally stay closer to ground temperature than outdoor temperature, I won’t lose as much heat through the floor as through the walls.

The local code enforcement officer indicated that I needed to either get a floor in place or put up a (rather permanent-sounding) fence around the site before the winter, and I didn’t want to spend a whole lot of money on fencing if I could just get the floor on.

To top it off, I was having trouble getting a useful structural load analysis that reflected my intended usage.  Somewhere in here, while I was busy trying to compute the transverse load for a 4′ span from the modulus of elasticity of extruded polystyrene, I turned a corner.  Was this really worth going out on a limb and then jumping from treetop to treetop over?  Load tables and beam strength calculations for wooden joists were incredibly easy to come by.  And they showed that all it would take was a 2×6 member spaced every 24″1 to span over 8 feet.  Heck, even a measly 2×4 would span 5 feet.  If these were then reinforced with a bottom layer of plywood (which would effectively prevent the bottom of the beams from stretching and make them even stronger) and topped with subflooring, I would have a structurally sound flooring solution.

It would need to be insulated though.  Polyisocyanurate foam board (often abbreviated PIR) is about the best insulation density you can get in an off-the-shelf product (R-6.5 per inch) and so 4 inches of this would put me at R-26 – exactly where the cheaper SIPs would have put me.  However, that would involve a lot of cutting foam to fit around the structural members.  I was also worried about the thermal bridging from all of the wood, particularly if I needed to space the joists 16″ OC to ensure a rigid floor and not need multiple layers of subflooring to achieve it.

I finally came up with what seemed like the key innovation to me.  If a 2×4 can span over 5′ at 24″ OC or nearly 6′ at 16″ OC, then as long as it’s structurally supported every 4′ or 5′, the 2×4 can actually serve the role as a floor joist.  Adding a 2×6 for every 3rd member would increase the strength further.  The PIR foam board I was looking to use2 is 2″ thick, meaning that it would in principle fit in the difference between a 3.5″ 2×4 and a 5.5″ 2×6, and from there it would actually provide some additional support to the 2×4.  At this point I could get away with only cutting each PIR board a little bit to fit between 2×6 members, and around the supports.

But now I’m only at R-13!  That isn’t very good insulation for a potential 25°F/14°C temperature differential.  Adding batts of 3.5″ rock wool, which is exactly designed for 2×4 spaces, adds another R-15 (total R-28).  The final assembly looks something like what is shown here.

And, I should be able to start getting the parts more-or-less immediately.  And, the whole thing will probably save me some money relative to even the cheapest of the SIPS.  Some extra labor, to be sure, but the sooner I can get started on it, the more likely I am to get this done before real winter hits.

A little afterword about the R-value.  Using data on individual components I’m estimating the average R-value for the entire floor at 25.9.  It’s interesting to see that 77% of the heat loss is through the two layers of insulation; 14% of it is through the 2×6 joists; and 8% of it is through the 2×4 joists.  Thus even though the 2×6 joists account for less than 5% of the total area, they’re responsible for a significant fraction of the heat loss.  If I had used 2×6 everywhere, the R-value would have been lowered to 23.6 (almost 10% worse) and the joists would have been 30% of the loss.


  1. The construction terminology is 24″ OC standing for “on center” – that is, the centers of the boards are 24″ apart.
  2. I don’t really care for Dow but the appears to be the only suitable PIR I can get locally.

Time to Build, Less to Write

We’re having a big thunderstorm this afternoon.  Before this, the weather had been good enough for the past few weeks that much of the free time I might have spent blogging about the Little Rental House was instead spent building it.  This is one of the reasons things have been so quiet here lately.  The other is that I sank a whole lot of time into a long, detailed post about rainwater collection, which still isn’t finished, and so what writing I have done hasn’t gotten published.  I promise, I’ll get that one out soon.

In the mean time, a little status update:

  • The basement slab was poured on Aug 5th.
  • I now have all five of the I-beam floor supports in place and bolted down (the photo below only shows the first two).
  • The 1″ insulation around the basement walls is about 60% finished, but has slowed down because I’ve found I need to clamp the boards in place while gluing, and I only built one clamp apparatus.
  • I’ve measured, cut, and started mounting the stringers for the basement stairs.

Finishing up the slab

De Basement

On Friday Jul 12, forms went up.  Actually, first they went down, slid from truck to hole along one of the same 2x12s that were used to form up the footer.

The forms are a pretty clever thing – they have both holes in the top and bottom flanges to allow them to be stacked and linked (my walls took two 4′ courses) as well as holes through that allow for breakaway ties that connect them against the weight of the concrete pushing outward when they’re filled up.

Originally, they were planning to pour the same day, but between the availability of concrete trucks, the length of the process, and the heat, they wound up calling it off and rescheduling for Monday.  Thus, on Saturday Jul 13, I had a chance to check the work, which seemed great overall.  I also took a number of photos to provide to our local Code Enforcement Officer, since he was out during the week and wasn’t able to visit the site between the forming and the pour.

I verified a number of things like the distance from the lot lines, which all seemed OK.  I did find a pair of pipes (for utilities) that were on the wrong end of the wall, but I was able to easily put in another pair.  The two grey pipes are the ones I added.

However, by the time I was done my clothes were covered in the release oil that they had put onto the forms.  Even though this was an “eco-friendly” release agent, it smelled so strongly that Raederle had a migraine within 15 minutes and I promptly tossed the clothes in a pile outside.

On Monday Jul 15, they came back in the morning to do the pour.  As much of the work (which is a lot) is done by the concrete truck, the team still had to stir and push the concrete away from the chute and into the forms with long 2×4’s.  It was a hot (80°F/27°C) and sunny day, but not yet the peak of the week.

For the end of the pour, they used the very clever “conveyor truck” which allows them to direct the concrete just by moving around a long tube.  That let them focus their efforts on the finesse of getting it level so they could finish the top surface easily.

Then they installed the anchor bolts that will hold the house down to the foundation.

Here is what it looked like at 8pm, several hours after they finished, as the concrete was setting.

The next day, Tuesday Jul 16, they were back to take down the steel forms.  Here is what it looked like partway through at a little after 10am.

Those steel forms that were easily slid down into the hole then all had to be lifted back out and loaded onto the trucks.  A lot of hard, hot, and thirsty work, on a day that got up to 88°F (31°C) with bright sun all day.  I brought them a gallon of ice water mid day when their own reserves were running low.  And here at last, is the finished product.  I now own (well, once they cash the check) a basement!

Set In Motion, Set In Stone

Today was a big day for the Little Rental House.  Today was the day when it became rather more difficult to get cold feet and quit.  What was just a hole in the ground yesterday is concrete in the ground today.  The footers were poured.  On Friday, they expect to return to build and pour the basement walls.

Today was perhaps the hottest day of the summer so far – something like 92 degrees Fahrenheit with high humidity, so I do not envy the team who came out to do the work, despite their bronzed skin and 6-pack abs.

A few interesting steps occurred along the way.  First of all, as they were setting up the forms, they asked me to order a load of stone (“Crushed Number 2 Gravel” looks something like this, although I got it from H.L. Robinson which doesn’t have pretty pictures on their web site).  They spread this on both the inside and outside of the forms to support the weight of the concrete.  Second, I got the first formal building inspection from the Town of Danby, when they came to review the installation of the rebar inside the forms before the concrete was poured.  They included the new NEC mandated ground connection to the rebar, where an extra piece of rebar was bent so that it protrudes out of the footer to provide a place to make a ground connection.

When the truck arrived to do the pour, they had to move around the chute of the truck, and an auxiliary chute that they used kind of a little “marble run” game to redirect the concrete to various areas.  They would then push (with shovels) the concrete to get it spread out evenly from where it was being dumped. 

One fellow generally worked with the concrete “float”1 while the other was working with the truck and pushing the concrete level.  They would also sometimes stir it up by rapidly inserting and removing the shovel, which helped to get it to flow and self-level.  (It’s not clear to me whether they were taking their level more from the nails in the forms or from the concrete’s own natural flow.)

They were also going around inserting the vertical rebar which will tie the walls to the footers.  They told me that with 3 people they could generally keep up with the truck’s pour, but with just 2 they were having to switch off jobs and had to stop the truck for several minutes at a time while they caught up.  Nevertheless, the whole pour was only 1h40m of the whole footer project.

The last part of the pour they had to do with the wheelbarrow (I believe I counted 8 loads), because the reach of the truck’s chute wasn’t far enough, and their own extension chute had a broken chain so they couldn’t attach it to extend the fill the remaining distance.  But pretty quickly, the pour was finished and smooth.  Because of the heat, it was already starting to set up by the time they got around to making the two ends meet.

So, if I’d ever considered having second thoughts about embarking on this project, I think the time is now past.  We’re building a house!


  1. I searched google to try to figure out where that name comes from, but didn’t find any good answer.

Ground Breaking News

I am now the proud owner of a big hole in the ground and several huge piles of dirt.

Additionally, at the far corner, you can see a couple of white drain pipes that will carry water away from the foundation (footer drains) and from overflow from rainwater collection, and dump them above the level of the nearby retention pond.  In contractor speak, these are referred to as “daylight drains” because they can see daylight at the downstream end; they don’t need a sump pump because they drain above ground just by gravity.

Excavation began at about 9am on Monday, when it looked like this:

Using the survey stakes set earlier, Enslow Landscaping1 dug about 7′ into the ground with about 3′ of extra space on the outside of each wall as working space for the foundation contractors.  The picture at the top was shot at just before 4pm.  Not bad for a day’s work, right?

Shortly afterward, it rained, and then I had several inches of water in the bottom of the hole.  My cat Zephyr decided to check it out.  (Curiosity and all that… I don’t think he’d die if he’d fallen in, but he would have gotten very wet.)

Then somewhere around 11pm on Tuesday night, as I was trying to go to sleep, I noticed something on reflection that I should have seen while it was right in front of me.  There was no excavation done for the stairs that go down to the basement!  I sent them a text, and they came back today (Friday) to address this and also to adjust the drains to get rid of the standing water.  Within a few hours (between 9:30am and 1pm) they had both issues fixed.

  1. I’d give the Enslow team a link, but like so many small construction businesses, they barely even do email much less have a web presence!

Deep Thoughts

No, not a Jack Handey reference, although I did find those amusing at one time.

I’m here to talk about my basement.  Why on (or more accurately, under) earth would I put thousands of extra dollars into a basement which doesn’t even provide living space?  It turns out that there are a host of reasons, many of which are quantifiable in dollar terms.

  1. Rainwater storage: $5,000 saved without direct burial.
    There are conventional water storage tanks which are designed to rest on a floor, and there are direct-burial “cisterns”. Even though both can be found in the price range of $0.70 to $1.20 per gallon, the cisterns tend to be on the higher end of the price range.  For 1500 gallons of water storage, a difference of $0.50/gallon is $750.  However, this is the least of the concerns.  A direct-burial cistern needs tank heaters if the frost line is below the level of the tank (and of course, it is here1).  These would obviously consume precious energy.  Then, there’s the excavation cost (assume a tank height of 48″, buried at maximum depth of 36″, in a 15’x10′ hole, excavated 8′ deep and then partially backfilled with compacted sand) which could add another $3,000.  Plus the materials for backfilling, perhaps another $1,200.
  2. Doing plumbing labor myself: $4,000 saved with basement.
    When one is doing plumbing work in a slab, one is literally setting into concrete the pipes and drains.  Any mistake (due to inexperience, or a design change) becomes extremely difficult to rectify after the fact.  I think it is fair to assume that being able to do the plumbing entirely myself will save $4,000.  (Typical plumbing costs for the reference homes were $8,500 to $9,200.)2
  3. Reduced heating costs relative to slab-on-grade: $150 per year
    By using the super-insulated SIP flooring over a relatively constant basement temperature, we’re able to save significant energy costs for heating and also require a smaller heating system. 3
  4. Solar storage battery lifetime extension: $600 per 10 years.
    Lead-acid batteries have a significantly extended lifetime and better retention of stored energy (albeit at a somewhat reduced capacity) if they are kept at lower temperatures.  Assuming a $2,000 battery array with a basic lifetime of 10 years, the loss in capacity might require a 10% increase in size, but the lifetime might be extended to 16 years.  Obviously the larger the battery array, the greater the impact, and this is an ongoing reduction in maintenance costs rather than a significant difference in initial cost.  The lifetime of electronics such as inverters and chargers is generally better at lower temperatures as well.
  5. Space for drain water heat recovery: $100 per year
    With a ground floor bathroom, it would be difficult to install a drain water heat recovery system.  This system can provide significant savings in the energy required to supply the home with hot water.
  6. Space for solar batteries and inverters.
    Although this doesn’t have a calculable direct cost impact, the fact that these large items don’t take up space in the home means that the living space doesn’t need to be increased to compensate.
  7. Space for greywater recycling.
    Again, this has no easily measurable cost impact.  However, because the toilet by itself uses over a quarter of the water in a typical US household, reuse of greywater from other sources for toilet flushing can dramatically extend the capacity of rainwater storage, allowing for a smaller system or better performance of the same-sized system (fewer “dry spells” that must be sourced from groundwater supplies).
  8. Space for rainwater first-flush system.
    Probably the greatest source of contaminants in rainwater comes from dust that collects on the roof between rain storms.  A “first-flush” system which discards the first 0.1″ of rain during each storm allows these contaminants to be washed away, providing much better water purity at the input.  Meanwhile, the flushed water can be routed directly to the greywater storage.  Such a system could be installed outdoors, but then it would be susceptible to freezing and potentially need to be disconnected during the winter time.  By implementing it inside the basement, it can be easily interconnected, easily maintained, and protected from freezing all at once.

So on the assumption that I have the house for 10 years, the basement is saving me on the order of $12,000.  Although I don’t have a direct way of comparing, this is comparable to the cost of the basement, and it also provides a number of non-monetary benefits listed above.

So, we go deep.

  1. Frost depth for a normal winter in the northeast is usually no more than 4 feet, so traditionally pipes are buried at 4 or 4 1/2 feet (5 ft for the main).  With only one day in February above freezing so far, the frost line has gone well below normal.
  2. Electrical work might be similar, except that in general very little of it needs to be done in the slab.
  3. Detailed calculation: Slab-on-grade, 102′ perimeter, 0.5 BTU/(hr-ft-°F), 24 hours/day,  6803 degree-days, adjusted to 8628 70°F-degree-days, gives about 10.6e6 BTU/yr.  SIP floor, 648 sqft, (70-50)=20°F temperature difference for comparability, R-41 SIPs, gives 361 BTU/hr or 2.8e6 BTU/yr.  Assuming a heat pump at $0.14/kWh, this difference is about $156/year.