As I started thinking about putting in the structural walls to support the floor joists, which need to go in before the second floor can be built, I started to agonize about certain aspects of the design that hadn’t really captured my attention before.
There are two areas on the original plans where very long (eight to ten feet long) “headers” (structural supports over openings) were needed to bridge over open areas: over the kitchen (shorter span, and less weight to bear) and above the two angled bedroom doors (longer span, and greater weight). I wanted to keep these headers limited to 2×8 members, so that they wouldn’t have to drop down significantly into the living space, but there are limits to what even a triple 2×8 can span and still provide sufficient structural support.

And then I found myself wondering why I had wanted those slanted doors in the first place. I mean, they’re harder to build, they take away from the floor space in the bedrooms, they don’t actually add useful floor space to the living room… they just seemed like a bad idea all around. Could I adjust the plan so that the doors were straight along the wall, thus providing a space between them where a vertical support (“jack stud”) could support the header?
One question led to another and pretty soon I was rethinking a lot of different things. What did I really want to do for loft access? Where would it go? Was the area I had carved out for the washer/dryer actually the right size? Were the closets the right size and optimally placed? Did I need three doors within a few feet of each other around the bedroom and bathroom? In the end I made a lot of relatively small adjustments, but several that I think are reasonably significant.
Raederle answered the question about the three doors with a resounding “yes”: given that the bedrooms open out onto the living area, it’s really important that at least one of the bedrooms offer a path to the bathroom without going into the common space. Imagine your kids have guests over and you’ve slept in… do you really want to have to put clothes on to get to the bathroom in the morning?
We decided that the aesthetic of a spiral staircase would add a lot of appeal to the interior design. This would take more floorspace (12-15 sq ft) than a drop-down attic stair (8-10 sq ft) but a whole lot less than a conventional staircase (33 sq ft), and despite the cost it would probably be worth the difference in making a more pleasant and usable space. The placement of this couldn’t be after-the-fact, since it would have to come in to an area where the ceiling height was at least 7′ (a maximum of 18″ south and 48″ north of the centerline). In the end, it pushed the doorway of the second bedroom to the south end of the wall. (One can argue that this slightly improves egressibility since it opens out right onto where the back door is located.)
I tried adjusting the closets to go adjacent instead of back-to-back. However, this created issues with the placement of the BR1-LR door and with ensuring the accessibility of the bathroom, and so instead I just stretched out the wall between them. The combination of the door and closet placement now means that BR2 could more easily accommodate two twin beds, by poking one into the corner created by the closet.
A little fine-tuning on the loft design now brings the northern loft area further out over the kitchen, which gives better access to the west wall window in the loft. (I may also take advantage of this to increase the kitchen cabinet sizes a bit on the right of the sink, though I haven’t addressed this in the design.) There’s a small area between the staircase and the bathroom where the loft floor meets the staircase platform which is actually cantilevered out, but it’s under 2′ long and I don’t think it will be aesthetically objectionable since it’s at ceiling height.
I ensured that the washer/dryer space was big enough for the larger (4.3 cu ft) unit rather than the smaller (2.8 cu ft) unit that I had originally projected; this means it will fit a wider range of solutions.
I adjusted the west wall of BR2 to be a 6″ wall instead of a 4″ wall, to provide extra structural support for the flooring and make it easier to route mechanicals. This wall is intended to come in partially overlapping the steel I-beam in the floor, so that it’s easy to route mechanicals to the side of the I-beam, while still being able to bear most of the weight directly on it.
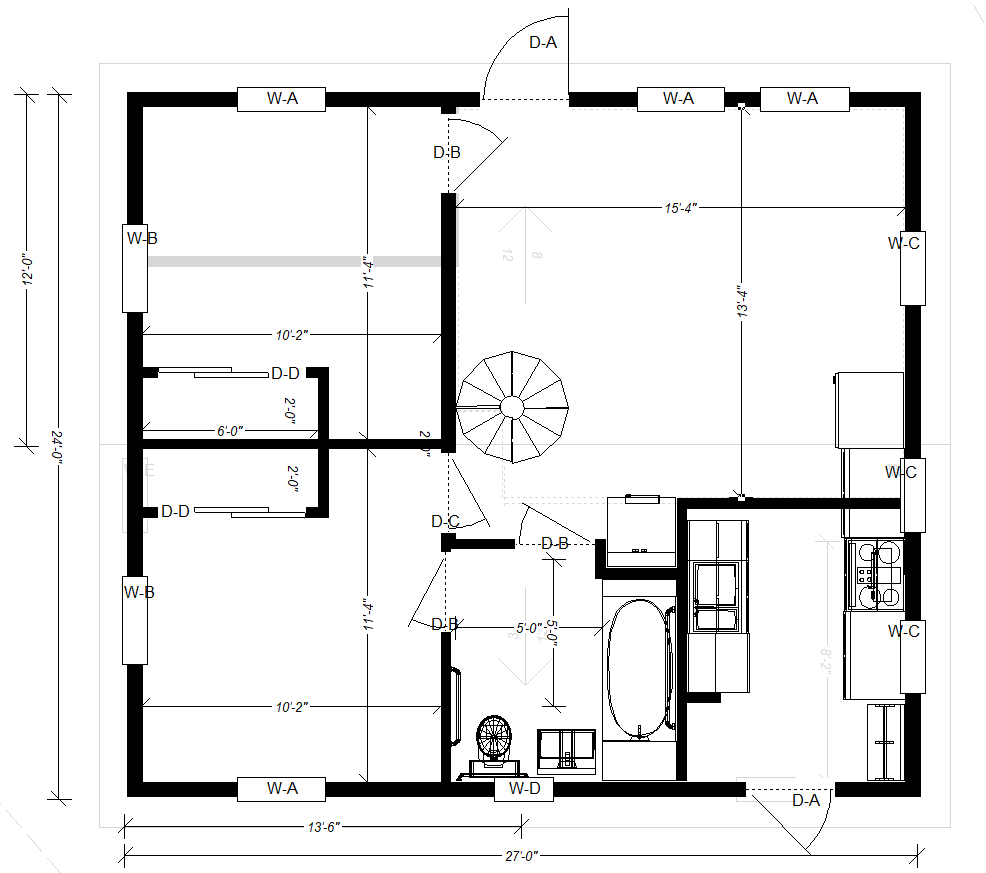
Below is the resulting changed plan. It probably doesn’t look much different unless you’ve been spending as much time thinking about this as I have… but it means that there are no headers on the west bedroom wall that exceed the width of a door, and the header over the kitchen falls into the range where three or four 2×8’s can easily provide the required support.
I needed to get this nailed down because one of the next steps is to actually lay out the placement of these walls on the subfloor, so that I can begin constructing the structural walls and then complete the rim joists and floor joists of the second floor.
Looks like a good plan: I like the changes. I think the spiral staircase is worth its space, and the non-slanted doorways are best for all you reasons.
Ideally, there would be counter space for folding clothes by the washer/dryer, but I don’t see any way to fit that in.
Re: the bathroom — If it were me, I would switch the toilet and sink, lay the sink against the other wall, and make a much bigger cabinet. This would also increase accessibility to the tub-corner.
I don’t think that switching the location of the toilet and the sink allows for an ADA compliant bathroom. The toilet needs to have a bar to one side, and the sink needs to have lots of clear space in front of it. But I could look into it.