See Foam Spray

When I talk about “foam spray” I’m not trying to conjure images of the (original) Little Mermaid, and I’m not even talking about the cans of compressed foam material that came with my SIP order.  What I’m actually referring to is the rather unexpected spray of small foam particles that I’ve been contending with since I began working with my new SIPs.

Murus panel router

Each SIP needs to be routed out at the top and bottom and at every edge where structural components (such as window frames) need to be added.  Murus Co., my SIP vendor, offers a cleverly designed tool to rout out the foam to the exact depth of a 2×6 member.


What they don’t tell you is that when you do this, it snows.  Not the cold stuff, because it’s snowing insulation after all.  Do not try this on a windy day.  To help with this, I decided I needed to make a separate tool, which is a foam-catcher.  I plug the shop vac directly into the end of this, and it does help contain the foam spray.

Foam spray containment boxHowever, the best solution so far has been actually getting up the first walls.  Once I had my corner in place (with some help from my more experienced neighbor Dane) I was able to get a few panels in place myself.  This shielded from enough of the wind that further routing inside the partial walls was relatively contained.

First four SIPs
Apr 19: First four SIPs installed

After this, I began installing more SIPs on the east wall.  By the end of the day on Apr 20, I had seven SIPs in place and I thought all was going rather well.

Apr 20: Seven SIPs

That was until I woke up on Tuesday morning and realized that I had forgotten to include the structural members in the center of the east wall which would provide the primary vertical support for the roof ridge beam.  Ugh…  So after attempting to pull out the ring-shank nails unsuccessfully, and a trip to the store to pick up a better tool, I was thrilled that I was actually able to pull out all of the nails rather easily.  Getting the panel loose from the foam which had glued it in place was a bit more difficult.  (Okay, a lot more difficult, it took longer to get it free than it took to get out the ~2 dozen nails.)  But eventually I was able to take it down, leaving me back at six nearly-completed SIPs on Apr 21.

Apr 21: Six SIPs

The SIP I removed (on the top of the wrapped stack) is still in relatively good condition; I was worried that I was going to have to cut it loose, but this turned out not to be necessary.  nevertheless, out of an abundance of caution, I’m going to put it aside for use in a non-load-critical location, probably on the second floor, just in case the process did invisible damage to the structure.  I’ll take a brand new SIP to replace it in this structural location on the first floor.

Unfortunately, the weather has now gotten too windy, snowy, rainy, and cold to proceed for a few days.  (The foam is supposed to be applied at temperatures over 50°F, and I doubt I could manage to hold onto a 4×8 SIP with 20 mile-per-hour winds.)  So I’m working on some other home projects for a few days, and getting this blog up to date!


Re-floor-mation Completed

Between Mar 1 and Apr 14, I completed the process of removing the old subfloor and replacing it with a new, lower subfloor, as described in my Floor Mark 2 post.  All told, I spent:

  • 89 hours constructing the original floor (2019-10-08 to 2019-11-21)
  • 12.5 hours in mitigation/drying efforts (2019-11-21 to 2019-12-13)
  • 32 hours removing the original floor (2020-03-02 to 2020-04-06)
  • 59 hours installing the new floor (2020-03-02 to 2020-04-14)

I finished getting the new joists installed:

Floor joists
Final section of new floor joists


…and reinstalled the subfloor the same day (although I didn’t get the photo until the next morning):

New flooring
New flooring finished


Then, I was ready to start on SIPs.  More on that in the next post.

Construction Becomes My Full-Time Job

Friday, Apr 3 was my last day with my previous full-time employer.  While many in the country (and some at my former employer) are being laid off due to COVID-19, this was a voluntary departure for me.  I gave notice on March 16, well before the future magnitude of the economic impact of COVID-19 in the US was clear to the average citizen.  (I kind of had an inkling, though many aspects of the timing and time course of events were still surprising.)

This now makes our little construction company my full time job.  I scheduled all of this to (supposedly) correspond with the delivery of my SIPs (structural insulated panels).  However, because of weekends taken delivering Raederle to and recovering her from a trip to Costa Rica, I lost a bit of the time I expected to have for removing the old floor (“deflooring” as I’ve been calling it) and reinstalling the new one.  Then, in a pleasant surprise, my SIPs arrived more than a week earlier than expected on Mar 25.  So now I’m a little “behind the eight ball“.  (Q: “How will house construction go?”  A: “Without a doubt”)

I want to try to update more often so that the rapid progress can be reported, but I have to balance that against getting the most out of the usable working hours.  So we will see how that goes.

New joists
I spent free time over the winter cutting new joists (Jan 3)
Floor deconstruction
When the weather looked good I began deflooring the house (Mar 25)
Removing moldly boards
As I suspected, the water during the winter had grown some mold (Mar 31)
Deflooring in progress
Deflooring in progress, most of the rockwool removed (Mar 26)
Floor stripped down
Much of the floor stripped down to PT plywood (Apr 1)
New joists installed
First row of new joists installed between I-beam and rim joists, and leveled (Apr 4)
Reinstalled subfloor
First portion of subfloor reinstalled over new joists (Apr 4)


And Now, Your Feature Presentation

I’ve been gradually building up a summary of the main features that I plan to include in the Little Rental House.  Some of these will go in with the first build; others might be “nice-to-haves” that get added once the home is actually ready for occupancy.

  • Accessible
    • ADA-compliant parking space
    • ADA-compliant bathroom, kitchen, living areas
    • ADA-compliant entrance ramps, etc.
  • Efficient resource use for heating and cooling
    • Walls, ceiling, and floor all insulated to better than R-40.
    • Double (or maybe triple) glazed windows for heat retention.
    • Heated with air-source heat pump to minimize power required.
    • Heat-recovery ventilator to provide fresh air with minimum heat loss.
    • Hot water heating inside heated space (reduces heat loss)
    • Drain water heat recovery unit
  • Minimum water footprint
    • Rainwater collection with filtration and UV sterilization
    • Downcycling of greywater for toilet flushing
  • Minimum power requirements
    • Low-voltage LED lighting used throughout to save power (< 0.25kWh/day)
    • DC refrigerator (< 0.7kWh/day)
    • Direct outlets for DC appliances (24V, 5V USB)
    • Two stage water heating with ultra-insulated storage (30 gal, est. < 0.5kWh/day) plus on demand system for large volume use (AC only)
    • Water pumping using low power, low voltage DC pumps (< 0.1kWh/day including sterilization)
    • Heat recovery from waste water (bathtub, clothes washer, sinks)
  • Grid-flexible solar power generation
    • Battery storage (about 10 kWh) for approximately 6 days including hot water, up to 2 days with constant heating.
    • Online inverter provides whole-house “uninterruptible” power supply

The City of Ithaca and Town of Ithaca are working on a new joint “energy code supplement” to encourage green building.  New construction should get a minimum of 6 “points” in their system.  My rough calculation for the proposed home is 11 points:

  • EE1: air source heat pump = 3 points
  • AI1: smaller building size = 2 points (under 1120 sq ft)
  • AI2: heating system in heated space = 1 point
  • AI5: modest window-to-wall ratio (13%) = 1 point
  • RE1: on-site renewable electric = 3 points (2350 kWh/year / 648 sf > 3.6)
  • OP4: meet NYStred Code-2020 Version 1.0 = 2 points (maybe, complex to evaluate)

Return On Equity – On Becoming a Rentier

Recently I took the time to read Thomas Piketty’s Capital in the Twenty-First Century cover to cover.1  One of the key concepts that it covers is the historical rising and falling of the “rentier” – namely a person who derives some or all of their income from rents on property that they own.  This topic is closely related to what would in modern economic parlance be referred to as “return on equity” (ROE) – in other words, the net income divided by the net investment (which can also be characterized as “assets minus liabilities”.)

One of Piketty’s theses is that ROE must “mean-revert.”  In less obscure terms, he suggests that there is some overall rate of return which is sustainable, and if the rate is higher than this or lower than this, it will eventually have to come back to this average rate.  High rates of return are only possible when there are significant structural changes to society (think “industrial revolution”) where those who start out with great resources will be the greatest beneficiaries, and will do much better than this sustainable rate.  In contrast, when the rates are too high, revolutions occur and those with the most to lose are, in fact, the ones who lose the most, while those with the least to lose are the beneficiaries.  Between these extremes, there is some stable mid-point which doesn’t greatly enrich the few or impoverish the many, and this is where society will eventually return.

Which is all really a long way of introducing the topic of whether building this house is a good idea, in both financial and ethical terms.  Let’s consider some of the relevant factors.

Income: I expect to be able to rent for something around $1300/month.  Single-room rentals near the two colleges are typically going for a lot more than $650, but they have convenience on their side; furnished two-bedroom homes can rent for as much as $1800/mo, but I’m not planning on offering this furnished.  On the other hand, the green features might command a premium with the right renters.  I could also consider trade-offs like charging a higher rent but throwing in utilities (on the assumption that utility bills will be very low) or offering some minimal furnishings (Craiglist, anyone?) but this seemed like a good starting point.

Expenses: I will minimally need to pay the current monthly maintenance fees (about $125) and property taxes (about $225).  Because the house is only legally a 2-bedroom home with a small footprint, the taxes should be considerably lower than for some of the other homes in this community.  There will be added maintenance expenses over time, but hopefully nothing major for the first few years, so I’ll allocate $50/mo for that, plus another $50/mo for homeowners insurance.

Assets: Assuming I’m on budget(ish), the home including the land and various extras such as solar panels, batteries, and water storage/treatment may cost $140k.

Liabilities: I intend to build this home with funds that I otherwise would have invested in more traditional retirement assets.  In other words, my intention is to pay cash and not take out a mortgage or construction loan to build it.  Thus,  no significant liabilities.  Ironically, the way ROE is calculated, this is considered to be to my disadvantage… but I’m much happier (and run a lot lower risks) living a debt free life.

Thus, estimated ROE is ($1300-$450)x12/($140000-$0) = 7.2% per annum.

Now, where else am I likely to find 7.2% ROE?  Mostly in things that are fairly high risk – corporate junk bonds, sovereign debt of nations in dubious straits, or real estate investment trusts.  One difference here, of course, is that I’m looking at something where I own the capital itself.  If I decide there’s another, better option, I could certainly consider selling the house instead of renting it, and get back my principal – with the possibility of additional appreciation on principal as well.  But the reality is that over my main portfolio of investments (mostly in retirement accounts), I’m only earning about 2.75% right now, because of a lot of relatively conservative and principled investments.  (Funds like LOWC, a low-carbon ETF, or ORG, an organics ETF do not return a high dividend; I do own a few stocks like PEGI, a renewable energy company, which has a >6% yield, but these are high risk and not something I want to invest $140k in.)

This was the argument I made to my financial advisor regarding the investment, and she pretty much concurred that it was a sound way to diversify.  Plus, if the economy falls apart and I lose my job or my retirement investments, the hope is that at least I’ll still have a valuable asset that I could either get income from or sell.

But is it ethical to be a rentier?  Well, I’m not really sure how to evaluate that.  I do know that the Ithaca area seems to have a continual shortage of housing, which I’ll be helping in my small way.  Furthermore, at least a few of the landlords have been reported in the news as rather unscrupulous – apartments with no heat in the winter and such things – and I certainly intend to do better by my renters than that!  What I hope to offer is something that is fair value for the area we live in, with a number of amenities that show people how to live a good life with a smaller ecological footprint.  And while I expect to make money doing this, I will certainly have put a lot of labor into making it happen.  I feel okay about this, and hopefully you, my dear reader, will not rise up in revolt against me for owning a rental property!

  1. Okay, I’ll admit I only skimmed the endnotes.  What happened to footnotes, people?  If the notes are on the same page, I’ll pretty much always read them.  If I have to keep two bookmarks just to find the corresponding endnote… less so.

Do Over: Floor, Mark 2

Since part of my goal is to document the process of construction, it’s time to declare my first major oops.  Maybe this will save someone else from doing something pointless and wasting time and money.  Sigh.

I am not happy with my floor implementation.  It feels solid and well insulated, but there are numerous issues with it that have led me to decide to start over.  In the end I expect I’ll waste about $600 and maybe a week worth of labor, but I think the end result will be better.

First, I wanted to nominate Terry S. for the “you called it” award on water.  Even with one layer of house wrap, fully taped, and not one but two 30×30′ tarps tented up and covering the floor, it is still basically raining inside every time the weather turns warm or launches into a downpour that melts the snow.  While I’ve had builders assure me that the water will just run through, and it will dry out, and it will all be fine, I’m not certain enough to trust putting the rest of the house on it without checking.  And checking means starting to peel up the subfloor so I can look inside, and once I start that if it looks bad, I’m going to need to redo things anyway.

But that by itself could just be a bit of maintenance in the spring.  No, there are a lot of other problems that have combined to make we want to start over on the flooring.

  • Elevation: because of the additional 6″ of height added by the flooring (which would of course have been there with SIPs as well) making the home accessible is turning out to be a lot more difficult that I would have liked.
  • Structural: the bottom inlet nailers for the wall SIPs would have been mounted to the floor stack, which itself is not really a tested structural element.  (SIPs would have been better, but not ideal.)
  • Levelness: in my rush to get the floor in place before the winter, I didn’t do a great job of shimming around the I-beams to bring the rim joist level up to the I-beam level.
  • Mechanicals: with the insulation sandwiched between the two layers, any mechanicals (plumbing and electric) going through to the basement would have to be cut through both layers of board plus insulation.
  • Water damage: may or may not have occurred.

So, I’ve come up with a new plan, and by choosing to go forward despite the possibility that the current floor is “sound” (with respect to the water – all the other issues would still stand), I have the opportunity to implement a good fraction of it (the first three steps) from inside the basement during the winter, so there will be less of a scramble to do the added work when spring comes.

  1. Cut 2×8 joists to fit between (and perpendicular to) the I-beams.  Notch these at each to a depth closely matched to the flange thickness of the I-beam, so that when assembled the top of the joist and I-beam will be flush.  (This addresses the elevation issue: subfloor will eventually sit 6″ lower.)
  2. Remove screws from bottom of current assembly.
  3. Insulate rim joists.  (May need to wait depending on other steps.)
  4. Strip off and stack the subfloor boards.  (If the subfloor was water damaged, then it would have needed to be replaced anyway, but if it’s OK I hope to be able to reuse it since I’ll be screwing back down to identically aligned joists.)
  5. Pull out and stack the rockwool for reuse.
  6. Strip off the 2×6 and 2×4 joists and the PIR.  (We’ll have to see what order of operations works best for this.)  Stack PIR for reuse.
  7. Strip off and stack the PT plywood.  (Need to determine if it can be reused elsewhere in the project; otherwise perhaps it will show up on Craigslist.)
  8. Correct the shims on the rim joists to as near flush with I-beams as practical.  (This addresses the levelness issue.)
  9. Finish mounting east and west joists with joist hangars from rim joists.
  10. Reinstall subfloor.
  11. Put off reinstalling insulation until after mechanical work is done.  (This addresses mechanicals issue.)
  12. Install inlet nailers with structural screws to rim joists.  (This addresses structural issue, and is the first step of the work I would have started in the spring anyway.)

It seems like a lot of steps, but it feels like I should be able to do most of them in less than a day.  So far I’ve completed the first eight of the 7′ joists and eight of the 4′ joists, and about 20% of the screw removal.  While I was at it, I also restacked some of the stored lumber in the basement so that it’s not directly under the drip edges.  The time spent has been about 3 hours so far.

For photos see my Apr 5 post.

Wow, I’m Floored!

For the last couple of weeks it has been “damn the winter weather, full speed ahead!”  And somewhat to my surprise, I managed to get the floor panels I designed (and wrote about here) completed.  Apparently after repeated exposures, my hands finally got used to working in 37°F (2.8°C) weather, and I didn’t feel cold any longer.  My ears were protected by 3M™ WorkTunes™ headphones, which may have been the single best tool investment I have yet made on this project.  Certainly the most consistently utilized, particularly with Spotify keeping my ears happy and not merely warm.

A big ($3000) order of materials was delivered in late October, and I immediately started trying to get the flooring in place.  Zephyr was intrigued.

Curious cat is curious

At first things went pretty quickly.

However, my birthday party happened just a day or two into getting the materials, so it was almost November before I really got going.  Below you can see the bracing ready for the 2x4s to come in above the PIR foam board, and the 2×6’s used for every third span (west side) and for all of the 7′ spans (east side).

Here is some of the PIR foam board in place, 2×4’s across the top and on the braces, spray foamed along edges of PIR, as well as the first batt of rockwool.

And finally here is what it looks like with all the rockwool in place.

Then I started to get the actual subfloor laid on top.  Unfortunately, not very long into this we had our first 4″ snowfall, and thereafter I was spending a lot of time with the shop-vac removing the snow and water that was stuck inside various cavities (either on top of the PIR board, or on the PT plywood bottom layer where the PIR board was not yet laid).  Furthermore, laying the tongue-and-groove subflooring with the appropriate staggered (and thus, diagonal) pattern turned out to be extremely time consuming.

It’s probably worth sharing that the necessary tools for this are one (or more) sacrificial 2×4’s and a sledgehammer.  You lay the 2×4 against the edge of the subfloor plywood (best if it’s the groove side) and whack the crap out of it to get the plywood to move across the glue and into place.  I shattered one 2×4 along the way and beat another one beyond the point of further usefulness.  Also, on occasion, you may want wood shims (used to force the tongue up into the groove) or a wonderbar weighted down with a heavy piece of PT lumber (used to force the groove plywood down onto the tongue).  Or, you could do this with more than one person, in which case, you get someone to stand on the edge to keep it aligned while you whack the 2×4.  This is definitely one of those “better done with a team” jobs.

But, in the end, I managed to get it all in place.  I still want to come back and add the house-wrap to the remaining 2/3 of the floor, to keep water out over the winter, but at least the main job is now complete!


Was it worth it to do all that extra complex framing for the 10% improvement in insulation?  I’m not sure – maybe not.  I’m estimating that adds up to maybe 85 BTU/hr or 25W of heating saved, whereas the remaining total loss through the floor is perhaps 875 BTU/hr or 256W.  The R-41 SIPs would have been closer to 553 BTU/hr for a savings of 94W.  (All these numbers may be lower if the equilibrium temperature in the basement is higher.)  But I learned a lot of interesting things along the way.

SIP Sliding Away

This week, I threw up my hands in frustration and did a small redesign.  I have been planning all along to use SIPs for the first floor flooring (above the basement).  Unfortunately, I have been so busy with other projects like fencing our back yard against deer and dealing with my duties as volunteer Treasurer for my community, that I didn’t actually get an order placed.  Add to this that the time frame for getting SIPs delivered turned out to be 3-4 weeks ARO (“after receipt of order”), this would have put me receiving the materials somewhere around when the average daily high temperature crosses below 50°F/10°C and the snow starts to fly.  Plus, the quotation came in about $2,000 over my budgetary estimate.  I could save some of this by using a lower insulation SIP – which would probably be OK – as the basement will generally stay closer to ground temperature than outdoor temperature, I won’t lose as much heat through the floor as through the walls.

The local code enforcement officer indicated that I needed to either get a floor in place or put up a (rather permanent-sounding) fence around the site before the winter, and I didn’t want to spend a whole lot of money on fencing if I could just get the floor on.

To top it off, I was having trouble getting a useful structural load analysis that reflected my intended usage.  Somewhere in here, while I was busy trying to compute the transverse load for a 4′ span from the modulus of elasticity of extruded polystyrene, I turned a corner.  Was this really worth going out on a limb and then jumping from treetop to treetop over?  Load tables and beam strength calculations for wooden joists were incredibly easy to come by.  And they showed that all it would take was a 2×6 member spaced every 24″1 to span over 8 feet.  Heck, even a measly 2×4 would span 5 feet.  If these were then reinforced with a bottom layer of plywood (which would effectively prevent the bottom of the beams from stretching and make them even stronger) and topped with subflooring, I would have a structurally sound flooring solution.

It would need to be insulated though.  Polyisocyanurate foam board (often abbreviated PIR) is about the best insulation density you can get in an off-the-shelf product (R-6.5 per inch) and so 4 inches of this would put me at R-26 – exactly where the cheaper SIPs would have put me.  However, that would involve a lot of cutting foam to fit around the structural members.  I was also worried about the thermal bridging from all of the wood, particularly if I needed to space the joists 16″ OC to ensure a rigid floor and not need multiple layers of subflooring to achieve it.

I finally came up with what seemed like the key innovation to me.  If a 2×4 can span over 5′ at 24″ OC or nearly 6′ at 16″ OC, then as long as it’s structurally supported every 4′ or 5′, the 2×4 can actually serve the role as a floor joist.  Adding a 2×6 for every 3rd member would increase the strength further.  The PIR foam board I was looking to use2 is 2″ thick, meaning that it would in principle fit in the difference between a 3.5″ 2×4 and a 5.5″ 2×6, and from there it would actually provide some additional support to the 2×4.  At this point I could get away with only cutting each PIR board a little bit to fit between 2×6 members, and around the supports.

But now I’m only at R-13!  That isn’t very good insulation for a potential 25°F/14°C temperature differential.  Adding batts of 3.5″ rock wool, which is exactly designed for 2×4 spaces, adds another R-15 (total R-28).  The final assembly looks something like what is shown here.

And, I should be able to start getting the parts more-or-less immediately.  And, the whole thing will probably save me some money relative to even the cheapest of the SIPS.  Some extra labor, to be sure, but the sooner I can get started on it, the more likely I am to get this done before real winter hits.

A little afterword about the R-value.  Using data on individual components I’m estimating the average R-value for the entire floor at 25.9.  It’s interesting to see that 77% of the heat loss is through the two layers of insulation; 14% of it is through the 2×6 joists; and 8% of it is through the 2×4 joists.  Thus even though the 2×6 joists account for less than 5% of the total area, they’re responsible for a significant fraction of the heat loss.  If I had used 2×6 everywhere, the R-value would have been lowered to 23.6 (almost 10% worse) and the joists would have been 30% of the loss.


  1. The construction terminology is 24″ OC standing for “on center” – that is, the centers of the boards are 24″ apart.
  2. I don’t really care for Dow but the appears to be the only suitable PIR I can get locally.

When It Rains, Do Like The Romans

I may have my idioms mixed up, but rainwater catchment goes back a very very long time in history.  Although it certainly goes back to the Indus Valley, in some sense it probably is prehistoric.  The Romans, however, applied their engineering skills to the task (along with the famous aqueducts), and made some significant innovations.

In this post I’m going to talk in some depth about my plans for rainwater harvesting, which has the two-fold purpose of demonstrating some interesting sustainability techniques, plus also reducing the ecological footprint of the construction and residence.  This post is also an experiment in a different writing style – I’m going to explain not only the design outcome, but many of my steps (and missteps) along the way.  A lot of people have written up their finished rainwater systems; it seems less common for people to talk about the ideas they have considered or the attempts they have made, which they later ruled out.  I hope this provides some interesting fodder for people designing their own systems.

Going back to the ecological footprint, there are three factors I wanted to consider: stormwater runoff, consumption of limited groundwater, and exposure to the potentially toxic chemical byproducts.

  1.  One of the major considerations for new development (at least in NY) is the “stormwater pollution prevention plan” or SWPPP.  The addition of impermeable surfaces (like roofs and roads) interferes with the normal absorption of water into the ground, and potentially causes significant additional runoff to arrive in streams.  Along with this runoff are various types of pollution that would be found on the surface, ranging from silt to fertilizer to motor oil from cars.  To the extent that we can minimize the amount of runoff, we can reduce the magnitude of the required catchment areas and reduce the amount of material deposited there.
  2. The sole source for drinking water in our community is groundwater (wells).  We have a pair of high-performing artesian wells that dip into a local aquifer that was recently studied extensively by the USGS.  (One of the wells was even part of their testing.)  However, as more homes are built both in our community and elsewhere in the town, the demand on this aquifer will increase, and it’s possible that at some point it will have trouble being replenished quickly enough to supply all of the needs.  Thus, having an independent source of water (rainwater) will both reduce dependence on, but also demand on this aquifer.
  3. Because our community exceeds the minimum size set out by the EPA for a “community public water system”, we are required to use “approved” chlorine treatment in our community water.  Many people respond badly to the chlorinated water and are filtering it back out at their own homes.  Even the CDC is now questioning some of the potential health effects of the by-products of chlorination.  By using rainwater and then not sending it underground, it should be legal to use filtration combined with UV sterilization (which is actually more effective than chlorine against cryptosporidium and giardia) to supply potable water to the home.  (The effort to get this approved in Tompkins County NY was led by a couple of intrepid “Earthship” homebuilders, for which I’m very grateful.)

For me the first logical step in thinking about rainwater is understanding rainfall conditions in our area.  So I created a rainwater calculator that utilizes raw data from the local weather station month-by-month over ten years.  Later, I realized that the effects of averaging over month-by-month data really prevented me from understanding important parts of the system, so after some digging for a reasonably trustworthy data source, I shifted to a model based on day-by-day data.  Even that has some limitations I don’t really like, but I was not able to find an hour-by-hour rainfall source that I could trust and match up with the seemingly reasonable daily and monthly data.  I’ve used these data to come up with an estimate of the average rainfall, to look at the amount stored over time, to understand how the amount of storage would impact both full and empty conditions, etc.

Basic Operational Features

First, let me explain some of the principles at play here.  I’m going to shamelessly lift some images from the Texas Manual on Rainwater Harvesting, one of the widely-cited references on the topic.  These steps are:

  • Rainfall – what are the regional properties of rainfall relevant to the design
  • Catchment – how is the water collected; how much area; relation to rainfall
  • Leaf filters – removing large objects such as leaves from rainwater
  • First Flush – cleaning sediment deposited on roof during dry intervals
  • Prefilter – removing smaller objects which might clog storage tanks
  • Storage – bulk water storage volume
  • Pressurization – bringing stored water up to usable pressure
  • Postfilter – remove remaining small particles that interfere with treatment
  • Treatment – making water safe to drink

The process for designing has been somewhat iterative.  For example, I first looked at the gross rainfall numbers, catchment area, and storage to get a ballpark idea of how much storage was likely to be required.  Then I later had to fine-tune these numbers based on expectations for filtering losses, greywater reuse, etc.  As I describe the work below, I’m working from the high level considerations down to the details.

Just as a note, I’m going to use some abbreviations below so I don’t have to keep writing out complicated units: gal = gallons, sf = square feet, gpd = gallons per day, gpm = gallons per minute.

Catchment and Storage

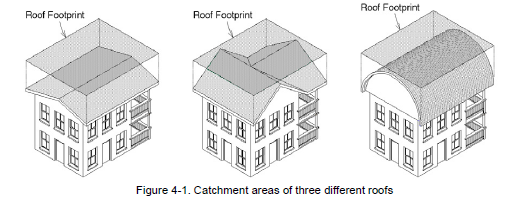
First, consider the roof footprint or “catchment area.”  Except in the case of a flat horizontal roof, this area is always less than the area of actual roof material.  Using this number doesn’t really account for unique aspects of the weather (such as prevailing wind direction) or the site (trees blocking rainfall or wind) but it’s still the best general approximation for how to convert “inches of rainfall” into “gallons collected” – specifically, 0.623gal of water for every square foot of area.  In my case, I began work using the slightly conservative estimate of the house footprint (648sf) rather than the roof, which will have some additional overhang (giving perhaps an extra 16%, or 754sf).  The smaller number gets me 404gal per inch of rain.

By using my modelling spreadsheet, I can see that he roof is collecting on average 43gpd given our local rainfall conditions, and that is cut down to 37gpd by some of the filtering considerations below.  (Some more is lost when the storage capacity is full, but we’ll talk about that in a bit.)

That covers the input (production) side.  However, in order to effectively simulate performance around the storage tanks, we also need to measure the output: water consumption.  Guesstimating water consumption is pretty difficult, particularly since I don’t even know who is going to be living in the home.  One could use anything from single occupancy up to a reasonable (by residential code) limit of 4 residents.

Because of my involvement with our Infrastructure Committee, I happen to have data that says that the average use in our community, measured as a function of the number of bedrooms, is about 38gpd/bedroom.1  Given that this is a 2-bedroom house, that would nominally mean 76gpd, corresponding to 4-person occupancy.

However, I’m going to adjust my estimates assuming that we’re able to implement greywater recycling for toilet flushing.  (It is easy to buy a simple version like SinkPositive that just allows you to wash your hands and uses that to refill the toilet tank, but I want something that works with an accessible sink and isn’t limited to just handwashing water.)  Toilets flushing is one of the largest single contributors to home water use, about 27% on average in the US.  Even using estimates for low-flush toilets rather than the less efficient ones many people still use, it is easy to account for 25gpd (32% of our 76gpd).  So let’s take this 25gpd, arriving at 51gpd for all other uses, for 4-person occupancy.  For 2-person occupancy we’ll just halve the number.

Hopefully it’s fairly obvious that the relationship between production and consumption is the most important aspect of system performance.  If you’re collecting only 37gpd on average, and using 51gpd on average, you’re not collecting enough water.  If you’re collecting 37gpd and using only 25gpd, you’ve got a surplus.  Storage helps at times, but it won’t change the overall picture, as shown in the graph below.2  With two people, we’re overflowing any reasonable amount of storage ~30% of the time.  With four people, we have a shortfall with similar regularity.  This is a direct reflection of the collection capacity of the roof. 


In the long run, one obvious way to address this is simply to increase the catchment area.  If we were, for example, 35% short, we could add another ~225sf of rainwater collection area.3 For this reason, I’m imagining that I may use a ground-mounted solar array, in part to increase the potential area for rainwater catchment.

So in essence, with the current roof area, the system right now is sized for what you might consider an average 3-person occupancy.  We will just work with this starting point and assume that either (a) the residents limit their water usage to what can be harvested from rainwater; or (b) the residents don’t mind using community water when they run out.  Of course, if you make those assumptions, then by definition you can’t compute anything interesting about storage.  We do want the system to have some storage, so for that purpose we’ll consider the 3-occupant, 37gpd model, i.e. where production and consumption are roughly similar.

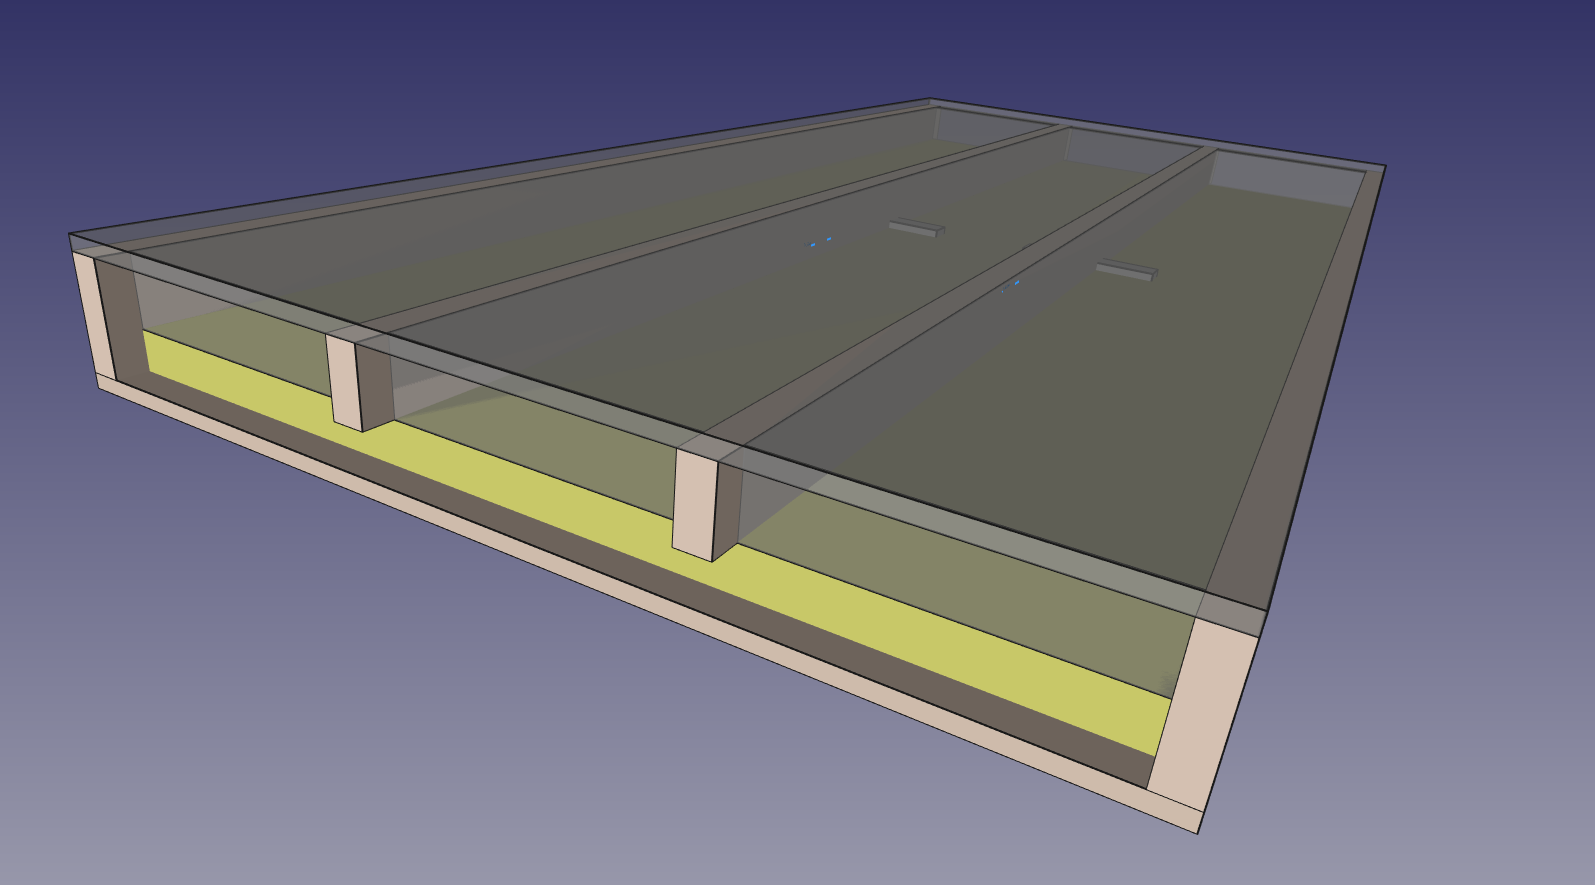
We also need to consider pragmatic limitations: the basement entrance won’t allow us to install or replace tanks larger than about 47″ in diameter; the ceiling limits us to tanks no higher than 92″ (and, if we want to be able to get any access to the top, probably more like 80″).  However, we can install multiple tanks, and interconnect them for more storage.  Each tank is adding system cost, but if they’re all ordered at once some of those costs (like delivery charges) will be constant.  My current working selection is a Rotoplas RP-590283 tank, which holds 300gal and is at present selling for about $250.  These are 36″ in diameter and 76″ high, so they are easy enough to get into the basement.  This means our storage capacity will be sized in 300gal increments.

Based on the graph above, you can see that more storage always helps, unless you’ve only got 2 occupants.  4 tanks (1200 gallons) will mean our 2-occupant family is only using community water about 1% of the time, and when starting from full tanks they can weather a 48-day total dry spell.4  For higher consumption, there’s always a return on storage, but even with just 3 occupants, reaching this 1% level would require more than 7000 gallons of storage, which is just silly.

For the present, I am satisfied with a 1500 gallon system capacity which will be more than enough for 2 occupants, leave 3 occupants on community water about 13% of the time, 4 occupants about 30% of the time.  Let us now turn to some of the more subtle design aspects.

Prefiltering and First Flush

The enameled steel roof that I will be using is pretty much ideal for potable water collection.  It doesn’t leach out much in the way of undesirable chemicals, like you might see from an asphalt shingle, plastic, or galvanized roofing material.  It doesn’t give off particles of its own, and it doesn’t particularly trap particles.  Also, since there are no trees of any size within hundreds of feet of the house, I don’t have to worry much about leaves.

Nevertheless, it’s helpful to put screen filters into the system to catch anything large that might be coming through.  Although these can go over the gutters themselves, or be put directly at the downspout entrance, that means needing a ladder to clean them, so I expect that I will opt for an inline filter basket in the downspout.  I haven’t definitively decided on a model, but some that I am considering are the AquaBarrel Slim Line at $50 or the Leaf Eater Ultra at $40.  Some of the cheaper products (Amerimax FlexGrate, $6) are not enclosed and seem like they would be too susceptible to letting as many things (dust, bugs, etc.) in than they keep out.  There are also more expensive products (WISY FS305, for $400 or more) that are pretty and made out of stainless steel, but which are likely overkill if there is additional filtration in the system, and needlessly push up the system cost.

For additional filtration, I plan on using a “first-flush diverter” to eliminate some of the fine particulates (e.g. summertime pollen and wintertime wood ash) so that the incoming water is cleaner.  The way this works is to assume that any time it hasn’t rained recently, the roof is dirty; based on this assumption, the first small amount of rain is shunted off to a holding chamber which captures the sediment along with that water.  When the holding chamber is full, the (now cleaner) water is directed into storage.  Typical recommendations are “13 to 49 gallons per 1,000 square feet.”5  I’m starting with a mid-range number of 23gal/1000sf, which roughly corresponds to another number I have seen, which is the first millimeter of rain.  Or, simply put, 15gal.

Now it turns out that if we have a rain of 1mm or less, then it all goes into the first-flush system – which based on daily rainfall data happens for about 27.5% of the rainy days.  On the other hand, because many rainfalls are heavy, I only lose a total of about 14% of the rainwater to the first-flush system.  (In fact, if we use the 2-occupant model, I actually lose more water – over 28% – due to the system being full and not having capacity for more water to be stored!)

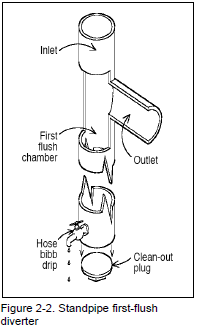
You can buy a first-flush diverter, but you can also build one, which turns out to be pretty simple.  There are a number of ways, but one of the simplest (shown here, again from TMRH) is simply a standpipe with a “weep hole.”  The sediment falls to the bottom of the standpipe; when the pipe is full, the incoming water can’t go into the standpipe any longer, and gets directed to storage.  In this partial cut-away drawing, the “weep hole” is actually replaced by an adjustable valve (“hose bibb drip”) but that isn’t strictly necessary.  So one can calculate the capacity based on the number of gallons that fit into a given diameter and length of pipe.

I tried to find a nice table for this, and the best I could come up with was this chart from Wake County, North Carolina.  The most readily available pipe is usually “Schedule 40” rigid PVC pipe.6  I made up a quick table for practical sizes that one might consider.  It is interesting that there’s a sweet spot in price per gallon for 6″ pipe.  The problem, of course, is that if you are trying to fit 15 gallons of storage into a vertical pipe in an 8′ high room, you can’t fit it into a 6″ pipe.  The 8″ pipe, on the other hand, will come in a little under 6′.

Nominal SizeGallons/Ft$/Ft$/Gallon
3" Sch 400.384$1.83$4.76
4" Sch 400.661$2.18$3.30
6" Sch 401.5$4.02$2.68
8" Sch 402.6$11.70$4.50

So imagine that we have that piece taken care of, what comes next?  Well, ideally we want to filter out any particles that still make it through.  Unfortunately, we don’t have a huge amount of pressure so most of the conventional filters that are used for city water probably won’t work.  Another filter that is sometimes used for rainwater is a “slow sand filter“, which is a biologically active filter that takes out both particulates and microorganisms that may be coming in.  However, true to their name those operate extremely slowly (gallons/hr rather than gallons/min) so they would need to have a lot of capacity to avoid losing useful rainwater.   There are, however, some filters that are specifically made for rainwater catchment.

The filter I’m most likely to go with is the Maelstrom which is made in Australia – a country where rainwater collection has become a bit of an art form.  The advantages of this filter are that it filters down to 180 microns (0.18mm) even though it can handle flow rates of 80 gallons per minute with minimal losses.  (Some people even use the Maelstrom as a direct filter for the downspout water, but it seems like it would be more difficult to clean so keeping the larger particles out should make it require less service.)  Also, it works with standard 4″ pipes, and can be mounted in any of several convenient ways including directly at the top of a tank.  While it would be great to get to 30 microns or less, we’ll save that for after the storage tanks where the water is pressurized.

Pressurization

In the storage tanks, the only pressure the water is under is its own weight – an 8′ high column of water gives about 3.5psi, and our tanks won’t even be that tall.  We need to increase the pressure to the level where appliances expecting city water (30-40psi) will operate normally.  If we were trying to handle large volumes of water, we would potentially need a big pump for this, and that means a lot of power.  However, if we have enough intermediate storage, we can potentially use a lower flow rate “slow pump” and thus avoid a big power draw.

It turns out this set of requirements exactly matches something that is widely available: fresh water pumps for recreational vehicles.  Pumps like the Shurflo 4048 from Pentair deliver exactly what we’re looking for: flow rates up to 4gpm, pressures up to 55psi, and operation from 12V at less than 10A.  We then need to couple this with a relatively large pressure tank to give the pump enough time to get the pressure back up for normal usage.  A Pentair WM25B, Goulds V260, or Amtrol WX-255D each provide 25-30 gallons while keeping the pressure between 30 and 50psi.

Postfilter and Treatment

We’re ready to make this water drinkable.  Because the water is not going underground again after treatment (for which the only approved solution in NY state would be chlorination), we have a number of options.  The most appealing, because of the lack of chemical residue, is UV treatment.  It wasn’t clear to me how much power this was going to take, but it turns out that it’s the equivalent of a light bulb.  One of the critical things for UV treatment, however, is ensuring that there is no sediment in the water that could block the UV light from treating it effectively.  A convenient solution to this is a combined sediment filter and UV unit.

While I was originally looking at Viqua (first some of their high-volume units such as VH410M and then later at S2Q-P/12VDC), none of these included a sediment filter.  I found the UV006 unit by PuraUV which includes the sediment filter, supports a higher flow rate (8-10gpm), and like the S2Q-P/12VDC can be operated from 12V for off-grid applications.  This draws only 22W – it requires less power than the pump!

To save myself from having to replace the filters in the PuraUV too often, I also plan to include one additional filter, a Rusco 15 micron spin-down filter.  The nice thing about these filters is that they can be cleaned simply by opening a “flush valve”, and the pressure of the water itself washes the accumulated grit off the filter.  Although they may need to be replaced eventually, they can be reused thousands of times rather than needing a replacement filter every 6 months.

Community Water Backup

There’s one step I’ve left off above, because it seems like it would confuse things, which the the backup for using community water when we run out of rainwater. I considered two slightly different ways to approach this: adding the backup water into the storage tanks, or switching the backup water on after the treatment system.  (Since this water is already chlorinated, it doesn’t need to be treated again.)

The advantages of going into the storage tanks are:

  1. The solution can be purely mechanical – like the valve on your toilet tank, a float valve can be used to turn this water supply on only when the level in the tanks is so low that they’re considered “empty.”
  2. The chlorinated water can effectively disinfect all the subsequent portions of the system, if there is every any sort of issue.
  3. A minimum level of water can be maintained which is always available with solar power, even if grid power is out.
  4. An “air gap” can be installed to prevent any chance of rainwater backflowing into the community system.

The advantages of switching the water on after the treatment system are:

  1. The pressure pump and UV system can be shut down when we’re out of rainwater, drawing no power and saving wear and tear.
  2. The backup water can be used to supply additional pressure if the rainwater system is not keeping up.
  3. Easier to integrate rainwater system after-the-fact.

Probably based entirely on the last reason in the list, I expect to start out with the house plumbing directly connected to the community water supply, and then as time and money allow, add in the rainwater system.  Then, if it appears at that point like the direct-to-storage-tank solution would be better, I can adjust the inlet plumbing to accommodate that.

Conclusion

Collecting a little rainwater for watering your garden is something anyone can do.  It is easy and certainly worthwhile.  In contrast, attempting to supply water to an entire household based entirely on rainwater, while making this more-or-rainwater_calculatorless invisible to a “western, developed-world” homeowner who expects never to think about where their water comes from, is an undertaking of an entirely different scale.  I hope that the data, tools, components, and overall thought process that I’ve shared here will make it easier for others to pursue similar projects in the future.

P.S. The complementary conjugate idiom, “When in Rome, it pours,” is probably somewhat less valid.  Rome gets less rainfall than Ithaca, averaging about 31 inches/year.
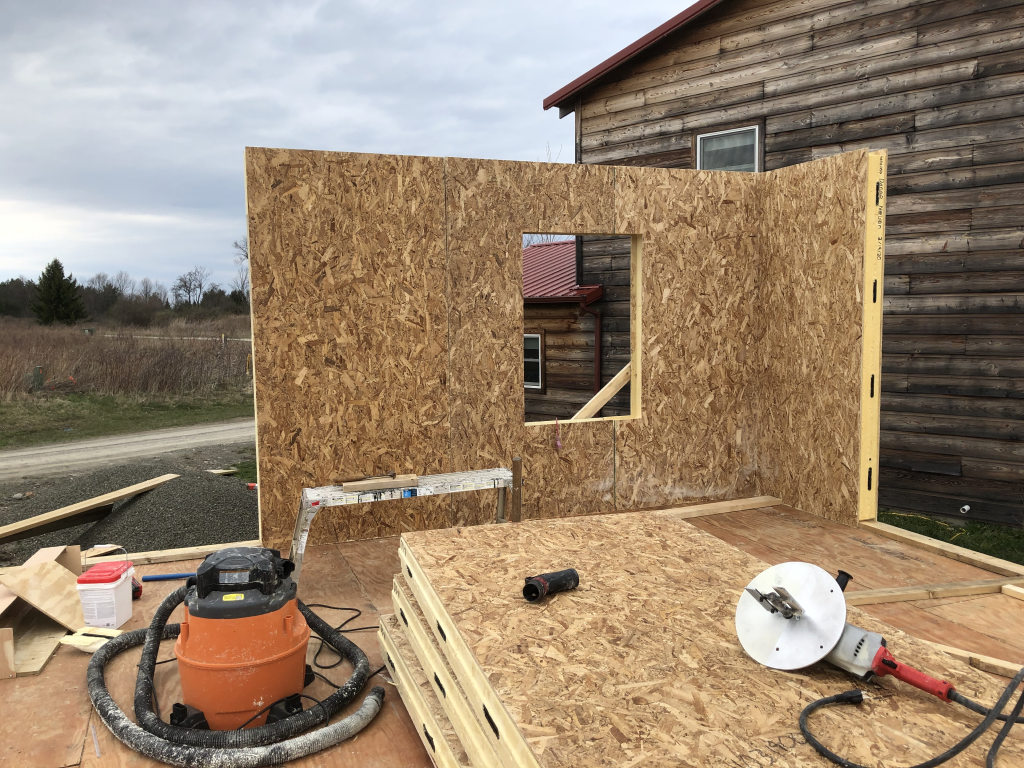
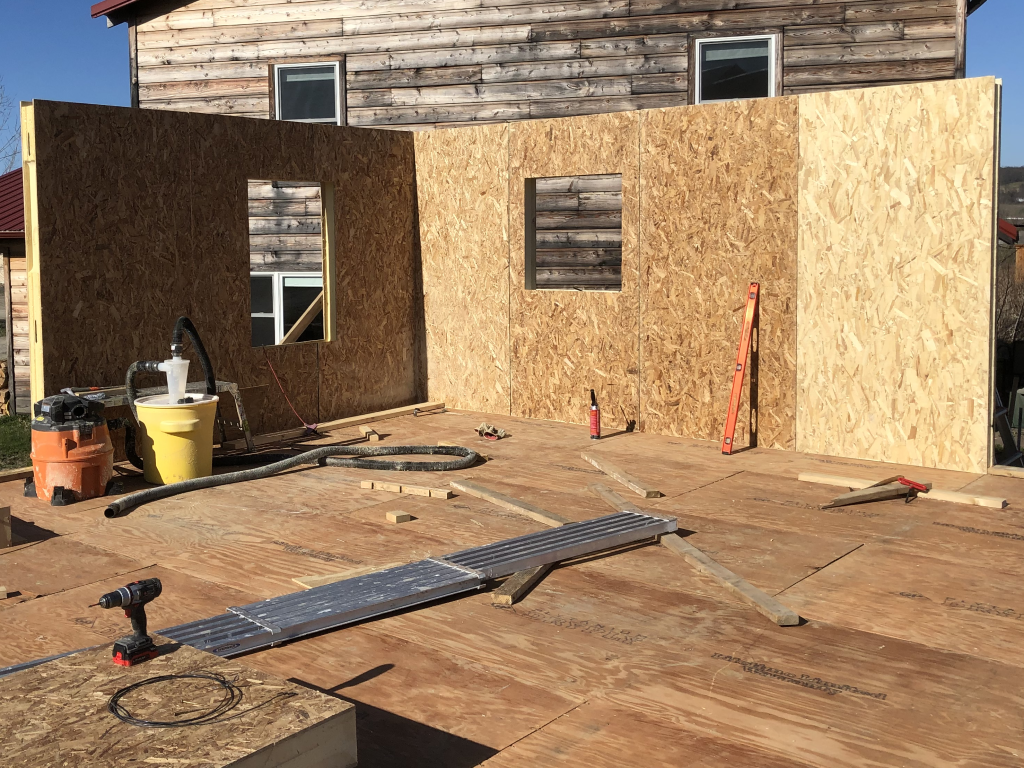
  1. This arcane way of measuring is what is utilized by the NY Department of Environmental Conservation in determining how to size a septic system.  But it gives us a hand-waving first approximation.
  2.  The orange/green/blue lines represent a 4-, 3-, and 2-person occupancies (51, 37, 25gpd) respectively.  The solid lines represent the system shortfalls at a range of storage capacities; the dashed lines represent water collection that exceeds storage capacity (i.e. overflows).
  3. As noted above, if I add to the house footprint 1′ roof overhangs on all sides, this increases the system capacity by 16%, and we’re now just 120sf short.
  4. The NY drought of 2016 is part of the main daily dataset I am using.  Our intrepid rain-drinking family of 2 might still have gotten 899gal (more than half of their water) from rainwater in June and July, taken a net 553gal from storage, and required only 108gal from the community supply.  Their longest dry spell would have been March 2015 when they would have gone for 19 days on primarily community water.
  5.  Texas Manual on Rainwater Harvesting
  6. I won’t digress right now into explaining what “Schedule 40” means… just take it as “the white pipe that doesn’t say ‘not for pressure use’.”

Time to Build, Less to Write

We’re having a big thunderstorm this afternoon.  Before this, the weather had been good enough for the past few weeks that much of the free time I might have spent blogging about the Little Rental House was instead spent building it.  This is one of the reasons things have been so quiet here lately.  The other is that I sank a whole lot of time into a long, detailed post about rainwater collection, which still isn’t finished, and so what writing I have done hasn’t gotten published.  I promise, I’ll get that one out soon.

In the mean time, a little status update:

  • The basement slab was poured on Aug 5th.
  • I now have all five of the I-beam floor supports in place and bolted down (the photo below only shows the first two).
  • The 1″ insulation around the basement walls is about 60% finished, but has slowed down because I’ve found I need to clamp the boards in place while gluing, and I only built one clamp apparatus.
  • I’ve measured, cut, and started mounting the stringers for the basement stairs.

Finishing up the slab